Access control
Gadget has a built-in, role-based access control system. As you build out models and actions, Gadget auto-generates permissions that control who can read data or run those actions. Access is granted through roles assigned to users and API keys.
You manage roles and permissions on the accessControl/permissions page in the editor, or in accessControl/permissions.gadget.ts when working locally with ggt dev. See the Gadget metadata files reference.
Roles
A Gadget app has one global list of roles that governs permissions across the application. Each role is a set of permissions that allow or deny access to a particular resource. People or systems that want to use a Gadget application must be assigned roles that grants them a set of permissions.
Every Gadget project starts with two roles:
unauthenticated: The unauthenticated role governs what an unauthenticated session or API key may access. By default, an unauthenticated session can't read or write any data other than the session itself. Gadget does not automatically assign any other permissions to this role.system-admin: Gives users or API keys permission to do anything in the system, which includes reads and writes via the Public API and reads and writes via the Internal API. This role is held by developers of your application.
New roles can be added if you want to extend your permissions system.
Gadget also creates roles automatically based on the features you use. Authentication adds a signed-in role for authenticated users. Shopify connections and BigCommerce connections add app-user roles for merchant sessions.
Permissions
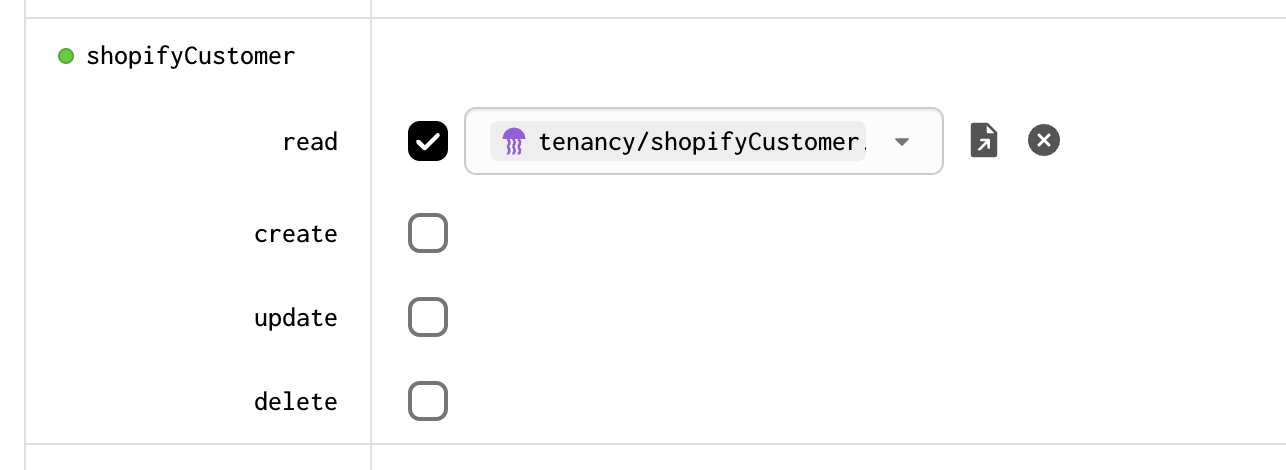
Every role, regardless of whether it's assigned to an API key or a user, is given a set of permissions. Each permission is represented by a checkbox in the Roles and Permissions screen. When the given operation's checkbox is checked, the users and API Keys who have that role assigned become allowed to perform the operation.
Permissions are automatically generated for your models. Every time you create a new model, Gadget automatically generates distinct permissions for reading the model (the read permission), as well as one permission per action for that model. For a default model with unchanged CRUD actions, the model will generate create, update, and delete permissions that can be given to the appropriate roles. If you add custom actions to a model, Gadget will also generate permissions for them.
Default permissions
You can automatically grant permissions to new models by using Permission Defaults.
The Default Read: On selection tells Gadget to automatically enable read permissions on all new models. The Default Actions: On selection tells Gadget to automatically enable permissions on all actions.
For unauthenticated roles by default you cannot allow read and Action permissions. This is intentionally restricted from accessing
models, as a vital safeguard against inadvertent exposure of personally identifying information (PII) and other sensitive data.
Filtered model permissions
You can permit certain roles to view only some records for a model by adding a filter snippet. Filter snippets can include all sorts of custom logic, like making sure a user is active, a user is in a certain group, or a Shopify session is only accessing data for their particular shop.
Different filters can be assigned to different roles, so you can allow administrators to view all the data in the system while restricting what data normal users (or unauthenticated users) can see.
Model filters are applied before any incoming filters from API calls, so they fully restrict what data a user can see, without them being able to "escape" the filter. If an API call also provides its own filters, searches, or sorts to further limit the set of data returned, those filters are applied in addition to the model filters.
Model filters are added by clicking the + Filter button next to an enabled permission for any model's Read or Action permissions. Within the file selector, you can pick an existing filter snippet or create a new one.
Writing filter snippets
Filter snippets are authored in Gadget's expression language, Gelly, so they can be scaled by the Gadget platform while still allowing custom or complex filtering logic. Each filter snippet file is expected to contain one Gelly filter fragment. For example, if we're building a blog application with a Post model, we can create a filter snippet that only lets users see Post records that have the published field set to a truthy value.
When this snippet is applied to a role, and a user with that role makes a request to read the posts, this filter will always be applied. This means the user will only be able to see posts that have been published.
Model filters can use boolean logic, access multiple fields of the model, and even traverse relationships of the model, just like any other snippet of Gelly. For example, let's say the Post model has a belongs to relationship to an Author model, as well as a boolean Published field and a boolean Archived field. We can update the post filter to only allow reads of posts with:
- a
publishedfield set to true - an
archivedfield set to false - and an
authorthat has not been banned
When a user with this role goes to fetch the post model, the system will examine the live values of the published and archived fields of the Post model and do a database join to examine the isBanned field of the Author model to filter down the returned set of posts.
Using properties of the session
Model filter snippets can filter data based on the identity of the session making the request. On each request, model filter fragments are passed a variable for the session making the request, allowing for the filtering of visible data by accessing the properties of the session.
For example, we could give blog post authors the ability to update only the blog posts they have written. If we have a Post model with a belongs to relationship to a User model and a belongs to relationship to the same User model on our Session model, we can add a filter to the Post Update action:
This filter ensures that the Post's userId field (generated by the belongs to relationship) matches the requesting user's id field.
The same strategy can be used to build multitenant access control schemes within Gadget. For example, we could build a platform that supports many different blogging teams by adding a Team model representing each group using the system and adding belongs to relationships to both the Post and User models. With this in place, we can then ensure users can only read posts for their team by adding a filter to the Post Read permission:
This filter ensures that the teamId field on the Post model matches the current user's teamId field, ensuring that different teams (tenants) can't see each other's data.
Requests authenticated using API Keys don't have an associated User or Session. If you assign a role to an API key that has a model
filter snippet, that snippet will always receive null for the value of the $user or $session variables. This can cause where
conditions in the model filter to fail and return no data!
Filtering on properties of a related model
You can also filter on related model's property. For example, if we have a Transaction model that belongs to an Account model, we can filter to load only transactions that are owned by the current user via an account relationship.
Shopify model filters
Gadget has built-in functionality for authenticating and authorizing requests made by a Shopify App. Gadget apps using the Shopify connection will have a Session model with a belongs to Shop model field. When a session is started using Shopify's OAuth authentication, the session will have this field populated with a reference to a shop record.
By default, Gadget will assign these sessions the Shopify App role and will set up default model filter snippets that ensure the session can only access data for its particular shop. This ensures that your multitenant Gadget application can safely store data and serve requests for multiple shops.
Gadget automatically manages the model filters for models owned by the Shopify connection, but not for models that you have created.
Models that should be governed by the same access control as the Shopify connection data should have model filter snippets added to the
permissions of the Shopify App role. This ensures users from different shops can't see each other's data for your custom models.
API key roles
We recommend using API Keys to implement secure system-to-system communication with a Gadget application. API Keys are great as a simple way to write a script to import data from your local development machine or as a secure way to move high volumes of data from another production system. API Keys are secrets, so care should be taken to ensure they are stored securely and never shared with untrusted parties.
When you create an API key you can choose whether or not you want to restrict the key's access to your application using roles. By default you will be prompted to select a role or set of roles that the key should be assigned. API keys cannot be assigned the unauthenticated, signed-in or shopify-app-users role so you will need to create a role for your API keys to use. If you turn access control for an API key it will be given the same permissions as a system-admin.
API Key role lists can be changed, but they can't be modified dynamically at runtime. If you need a wide variety of different permissions for different actors in your system, consider creating one API Key for each actor, or using a model with the role list field type.
Deprecated filtering syntax
Gadget previously used a different syntax for model filters that use the fragment keyword, looking like this:
Filters using fragment are equivalent to filters using filter in both performance and functionality. But, since they have extra, unneeded syntax, Gadget recommends using the filter syntax instead.