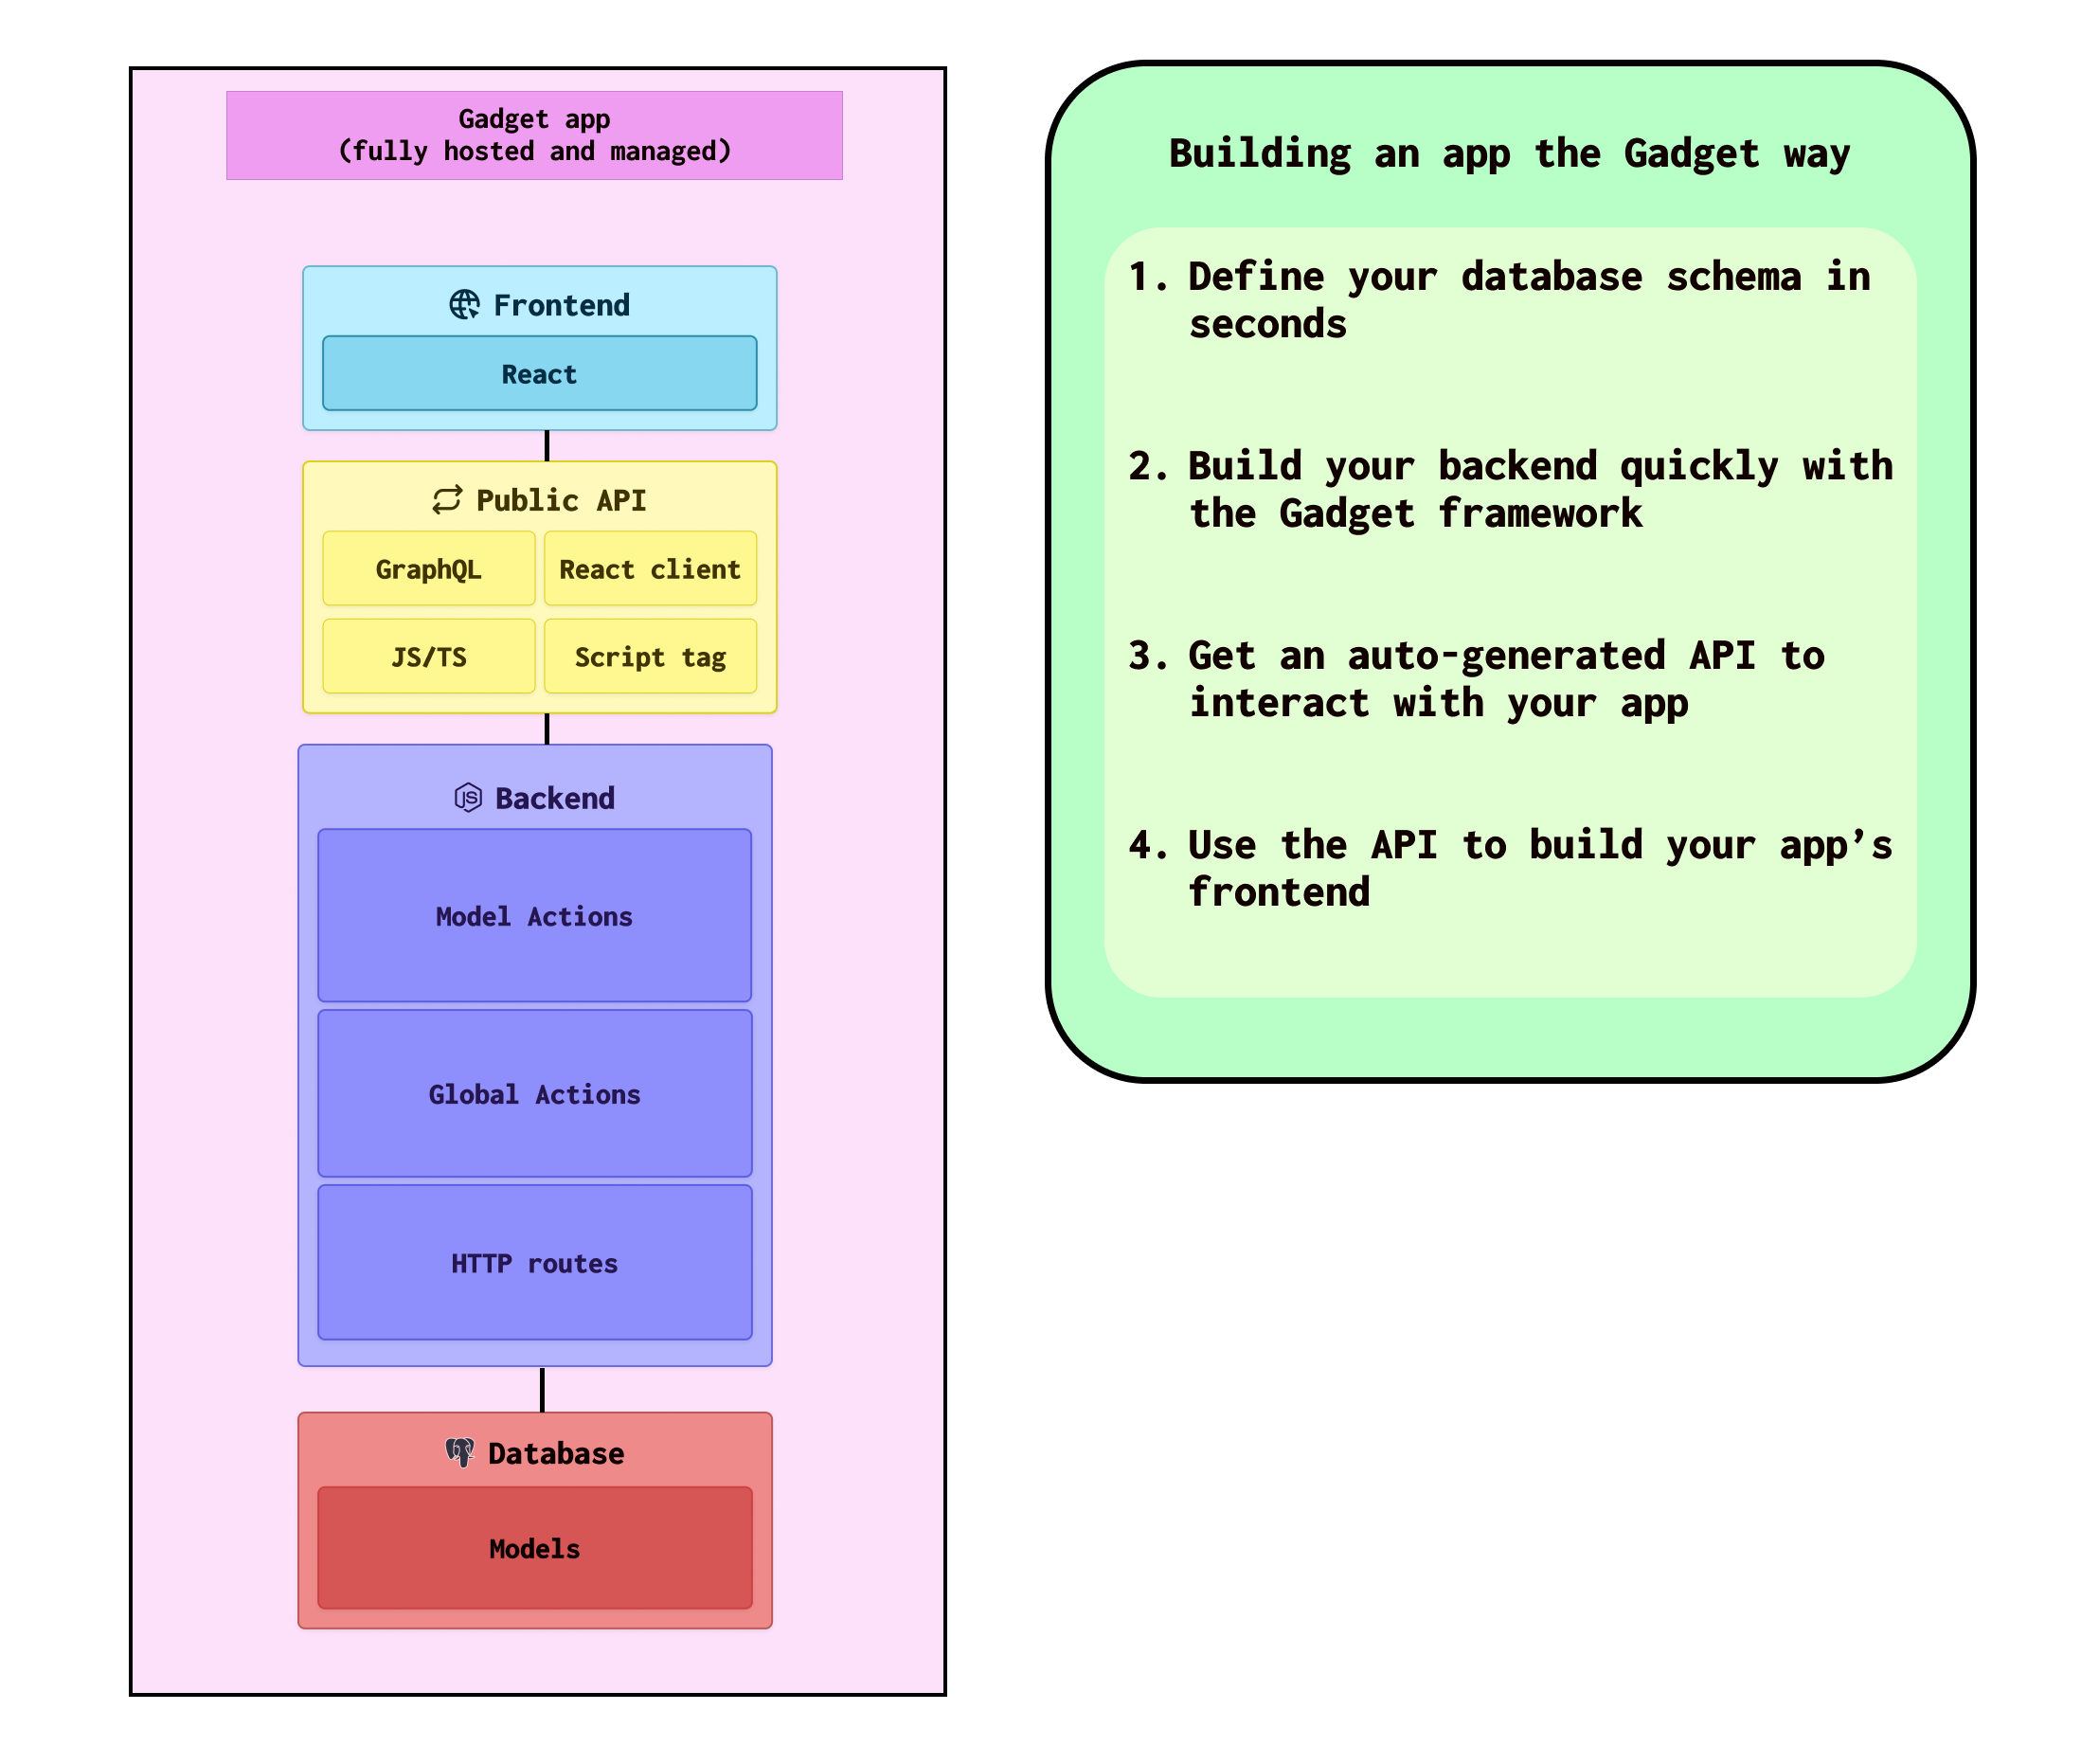
How to build a Gadget app
In Gadget you're provided with everything needed to build a full-stack application.
To build out your app ensure you follow the steps below:
- Define your schema in seconds
- Build your backend with the Gadget framework
- Get an auto-generated API to interact with
- Use your API to build your frontend
No need to worry about managing how to host or scale your app. Gadget takes care of hosting applications by providing a serverless environment for your database, backend, API and frontend of your app.
Upon project creation, you're given a development and production URL, where Gadget hosts the corresponding environment's functionality. This eliminates the need for complex deployment steps, as you can push your app from development to production with the click of a button.
1. Define your database schema in seconds
Gadget provides a fully-managed and flexible database powered by Postgres for your application. It handles the creation, maintenance, and scaling of your database, including essential tasks such as backups and automatic indexing. Start building your Gadget application by defining your data models.
Models
A Model in Gadget represents a table in the underlying Postgres database, and it serves as the foundation for creating and organizing your application's data. Each model consists of a set of fields with specific data types, optional validations and relationship setup, which together define the shape and rules for the data stored within that model. When you create a model, Gadget automatically generates a GraphQL API for your application, enabling you to perform CRUD (create, read, update, and delete) operations on your models.
For more information on models, check out the Models guide.
2. Build your backend with the Gadget framework
Once you've defined your data structure, Gadget provides a powerful backend for building your application. It offers a serverless Node.js environment for running your JavaScript code, accompanied by actions that are a way to organize and execute your backend code.
An action is a unit of work that your application can perform, defining the behavior of the application. They work as serverless functions with a defined framework eliminating the boilerplate code that developers commonly set up (event processing, authorization, etc) and respond to various triggers, such as user interactions, API calls, or webhooks from external systems. Actions help developers streamline their applications by handling custom logic like input validation, record updates, third-party API interactions, and more.
For more information on Actions, check out the Actions guide.
Action framework
The Gadget framework for an action can be broken down into 3 steps:
- Triggers - An action occurs when:
Actions are initiated by a Trigger. Triggers can be GraphQL API mutations, webhooks from third-party services, or scheduled events. Triggers define when an action should be executed.
- Permissions - Before an action is executed:
Gadget checks if the current user or API key has the necessary permissions & settings enabled to perform the action. Permissions determine who can run an action.
- Effects - When an action executes, what happens?:
Once an action executes it performs certain effects. Effects are the building blocks of actions that define the custom logic and operations to be executed when an action is triggered. They are the "what" of an action, dictating the tasks to be performed, such as record manipulation, API calls, or data logging.
Model Actions
Model Actions are actions that run in the context of specific records. These actions are ideal for operations that involve particular records within a Gadget model.
To determine whether to use a model action, ask the question, "Does this action operate on a specific record of a specific model?". For example in a project management app, a model action 'markAsComplete' on a 'task' model could be used. This action updates a specific task record's status to 'completed' when a team member finishes their assigned task, providing real-time updates to the project's progress.
Global Actions
Global Actions are actions that run outside the context of any particular record. These actions are used for scenarios that don't involve specific records but still require the Gadget framework's support.
To decide if a global action is appropriate, consider if the action doesn't read or write data to or from a specific central record. For example in a project management app, a global action like 'dailyStatusUpdate' could be used to summarize the day's completed tasks and upcoming deadlines from all projects, then send a report to all team members. This doesn't interact with a specific project or 'task' record, but fetches and processes data from multiple records across the application.
HTTP routes
HTTP routes are true serverless routes in Gadget. They're used as an alternative solution to actions in situations where developers need to handle custom requests or scenarios that fall outside the scope provided by the standard action framework (sending JSON responses, handling webhooks from connections not provided by Gadget, or dynamically generating files). They consist of a URL pattern and a handler function that executes when someone accesses the specified URL on the app's domain and can be found within HTTP routes in Gadget are defined as files in the routes folder, each route has a specific filename which determines the URL path the route.
For example, if you wanted to send an SMS every time a Shopify Product is created in a store, you would use a model action because Gadget has a connection that handles triggers for Shopify's webhooks. But if you wanted to send an SMS when Stripe sends a webhook, a connection for which we do not yet have a trigger you would use an HTTP route.
For more information on how to use HTTP routes, check out our guide here.
Routes in Gadget do not automatically generate API endpoints like model actions or global actions. Routes are more suitable for handling custom URL patterns and executing specific logic when needed.
However, to get the most out of Gadget, it's recommended to use model and global actions for most of your application's logic. These provide a more structured and integrated approach to handling data and user interactions within your Gadget app.
3. Get an auto-generated API to interact with your app
As mentioned earlier when you create your models, your GraphQL API is auto-generated.
This publicly accessible API allows your frontend, whether hosted on Gadget or elsewhere on the internet, to communicate with the Gadget backend. It additionally supports reading and writing groups of related records, includes permission controls, and allows for custom problem-specific endpoints. It is implemented using an advanced database query compiler, which alleviates concerns about N+1 query issues or join performance.
Gadget also provides a JavaScript and React client for seamless API interaction, which can be easily installed with a single npm command. The API client is fully typed for TypeScript users, ensuring accurate data traversal.
4. Use the API to build your app’s frontend
Gadget provides a React frontend for your applications powered by Vite, which allows for rapid frontend development without any setup.
Use your API to fetch data from your models to display within your frontend you can use the @gadgetinc/react hooks library. This library provides powerful hooks for fetching data from your Gadget app. Each of these hooks returns an object with the requested data, the fetching state, and an error if one was encountered, as well as a refetch function for refreshing the data if needed.