Building Shopify apps
Where and how Shopify data is saved
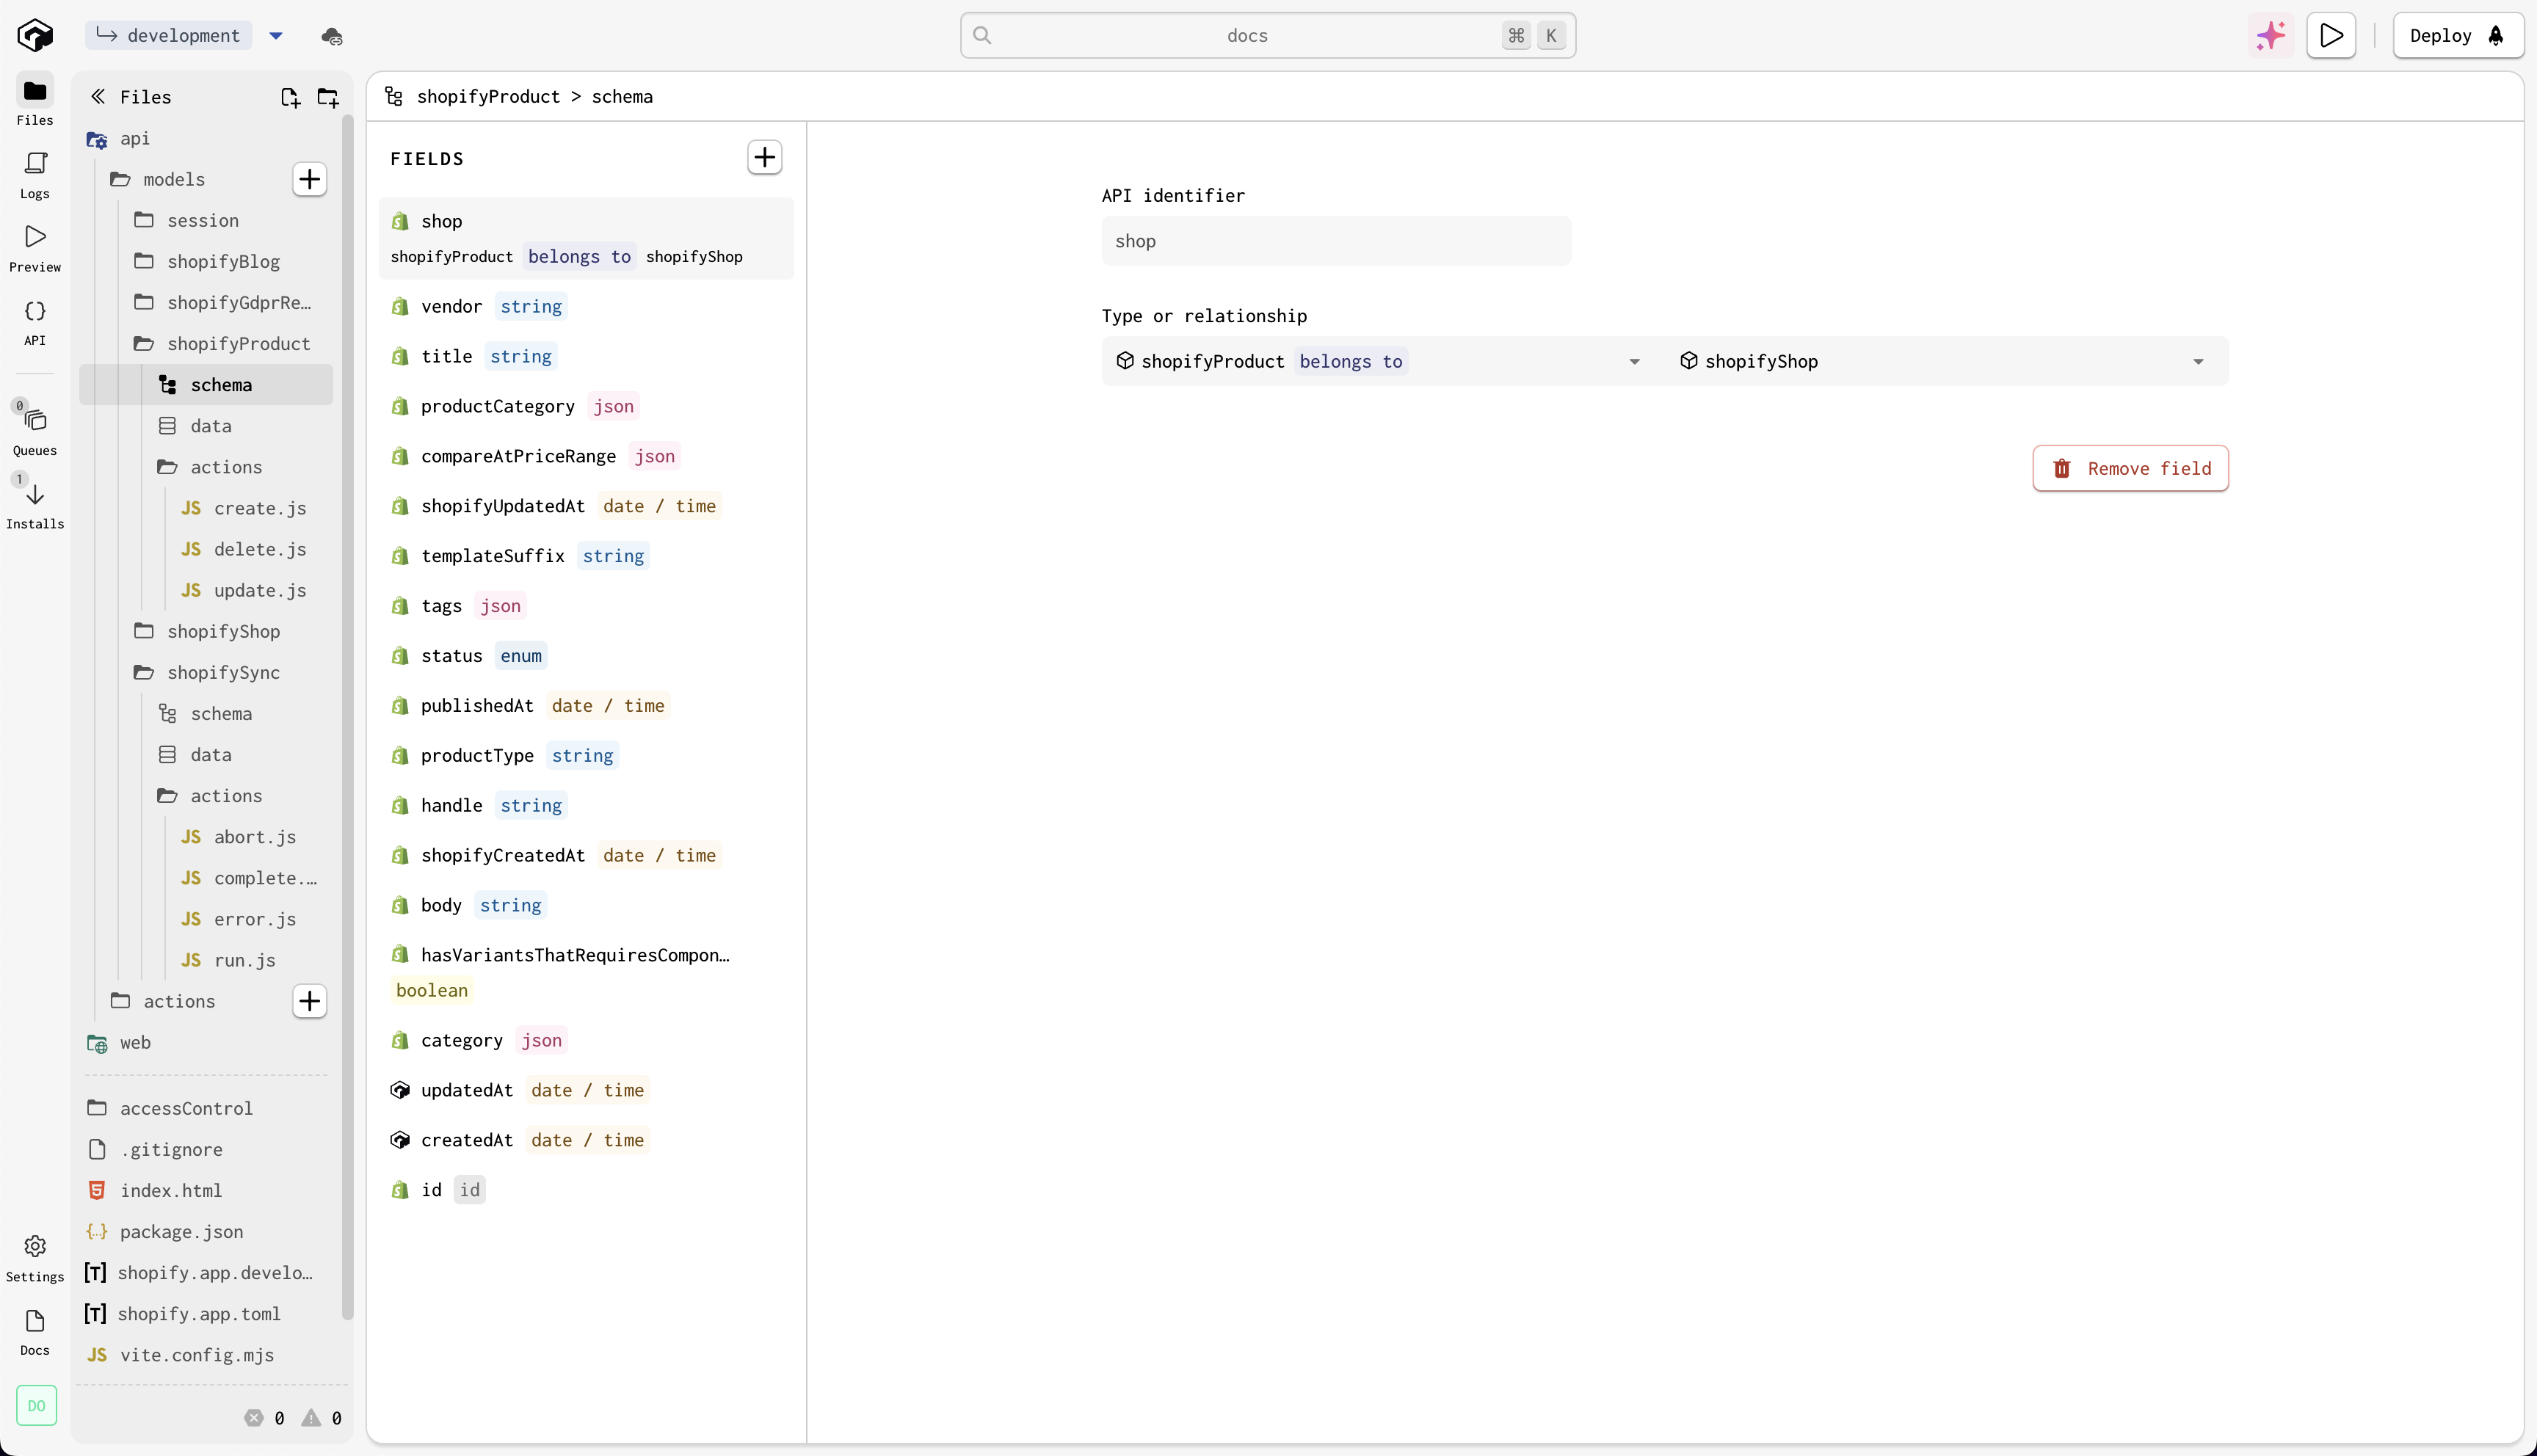
All of the Shopify fields are mapped to a corresponding field in your Gadget model, and then these Gadget model records are updated when Shopify sends webhooks, or you sync data. You can identify these fields by looking at the schema for any of your app's Shopify models and finding any field with the Shopify icon.
When a record in Shopify is changed, Shopify sends a webhook to your Gadget application, which triggers the appropriate model Action. A model's create webhook will fire the create model Action, update will fire update, and delete will fire delete. All of the incoming fields from the webhook are mapped and stored in their corresponding field in Gadget.
Syncs work much like webhooks in that they will create or update records in Gadget. However, Gadget currently does not delete any models that exist in Gadget but no longer exist in Shopify.
Gadget does not automatically write data to the Shopify database. If you want to make changes to Shopify data, you should make API calls to the Shopify API from within your Gadget actions. See Accessing the Shopify API for more details.
Shopify models
Once set up, all of the models based on your selected scopes are now part of your app's GraphQL API, and you can query them like any other model in your app.
You can also add your own fields to these models. If you want to store extra data about each record from Shopify, Gadget will happily support adding a new field to the Shopify model with any of Gadget's supported field types, including relationships, and file fields.
Fields added to Shopify models can also be marked as metafields for syncing from Shopify.
Shopify model actions
You can extend the create, update, and delete actions on Shopify models. Extending these actions allows you to react to changes within Shopify. You may also add your own actions, allowing you to define your own business logic to manipulate any data in the context of the record.
For example, you can react to a product being created by adding a code to the create action on the shopifyProduct model:
Gadget will run the create action for this model any time a product/create webhook is emitted by Shopify or if a new Product record is discovered during a sync.
You can also add a custom action to the shopifyProduct model to run additional business logic, triggerable by you instead of a webhook. For example, you can add an action to update a product's title to be all uppercase. To do this, you would add a new file in the actions folder of the model, and implement the run function:
This action would be available to run on any shopifyProduct record in your database.
Removing default model actions
You can also remove the existing create, update, or delete actions from your models, but this will prevent the connection from being able to perform those actions in response to webhooks/syncs. For example, if you remove the delete action from the shopifyProduct model, your Gadget database will no longer remove products when Shopify sends products/delete webhooks, preserving a long-term record of all products ever seen.
Gadget doesn't prevent you from deleting models, but doing so may prevent data from being updated. For example, if you have a product and product variant model, deleting the product model will mean that you no longer get updates to variant records. Deleting the product variant model is fine, and will not prevent products from being synced.
Key Shopify models
In addition to the models available to you based on your selected scopes, the Shopify connection creates three additional models: shopifyShop, shopifySync, and shopifyGDPRRequest.
shopifyShop
The shopifyShop model is a representation of a Shopify shop connected to Gadget via the Shopify connection. It stores information about the connected shop, and a record is created when a shop is connected for the first time.
Logic that should run on app installation can be added to the install and/or reinstall actions. For example, you may want to run an initial data sync when a merchant installs your application. Take a look at our syncing docs for more details.
shopifySync
The shopifySync model represents the data sync between Shopify and Gadget for any given connected Shopify shop. Like the shopifyShop model, you can run logic on the creation of a sync record, which will execute whenever a sync is initiated between Shopify and Gadget.
shopifyGdprRequest
The shopifyGdprRequest model represents requests from Shopify's mandatory webhooks in compliance with General Data Protection Regulation (GDPR). You can add custom code to the shopifyGdprRequest model's create action to handle the request as needed, ensuring your app is GDPR compliant.
To view your GDPR webhook URLs, or read more about the Shopify plugin's GDPR functionality, see below.
Protected customer data access (PCDA)
You will need to ensure that you request access to protected customer data if you are using one of the following models:
- Shopify Balance Transaction
- Shopify Cart
- Shopify Checkout
- Shopify Comment
- Shopify Customer
- Shopify Draft Order
- Shopify Event
- Shopify Fulfillment Order
- Shopify Order
- Shopify Company
The protected customer data access form is only required for public apps or for apps without a distribution method set.
If you have selected the custom distribution option for your app in the Dev Dashboard, you do not need to complete the form and it
will not appear as an option in the Shopify Partner dashboard.
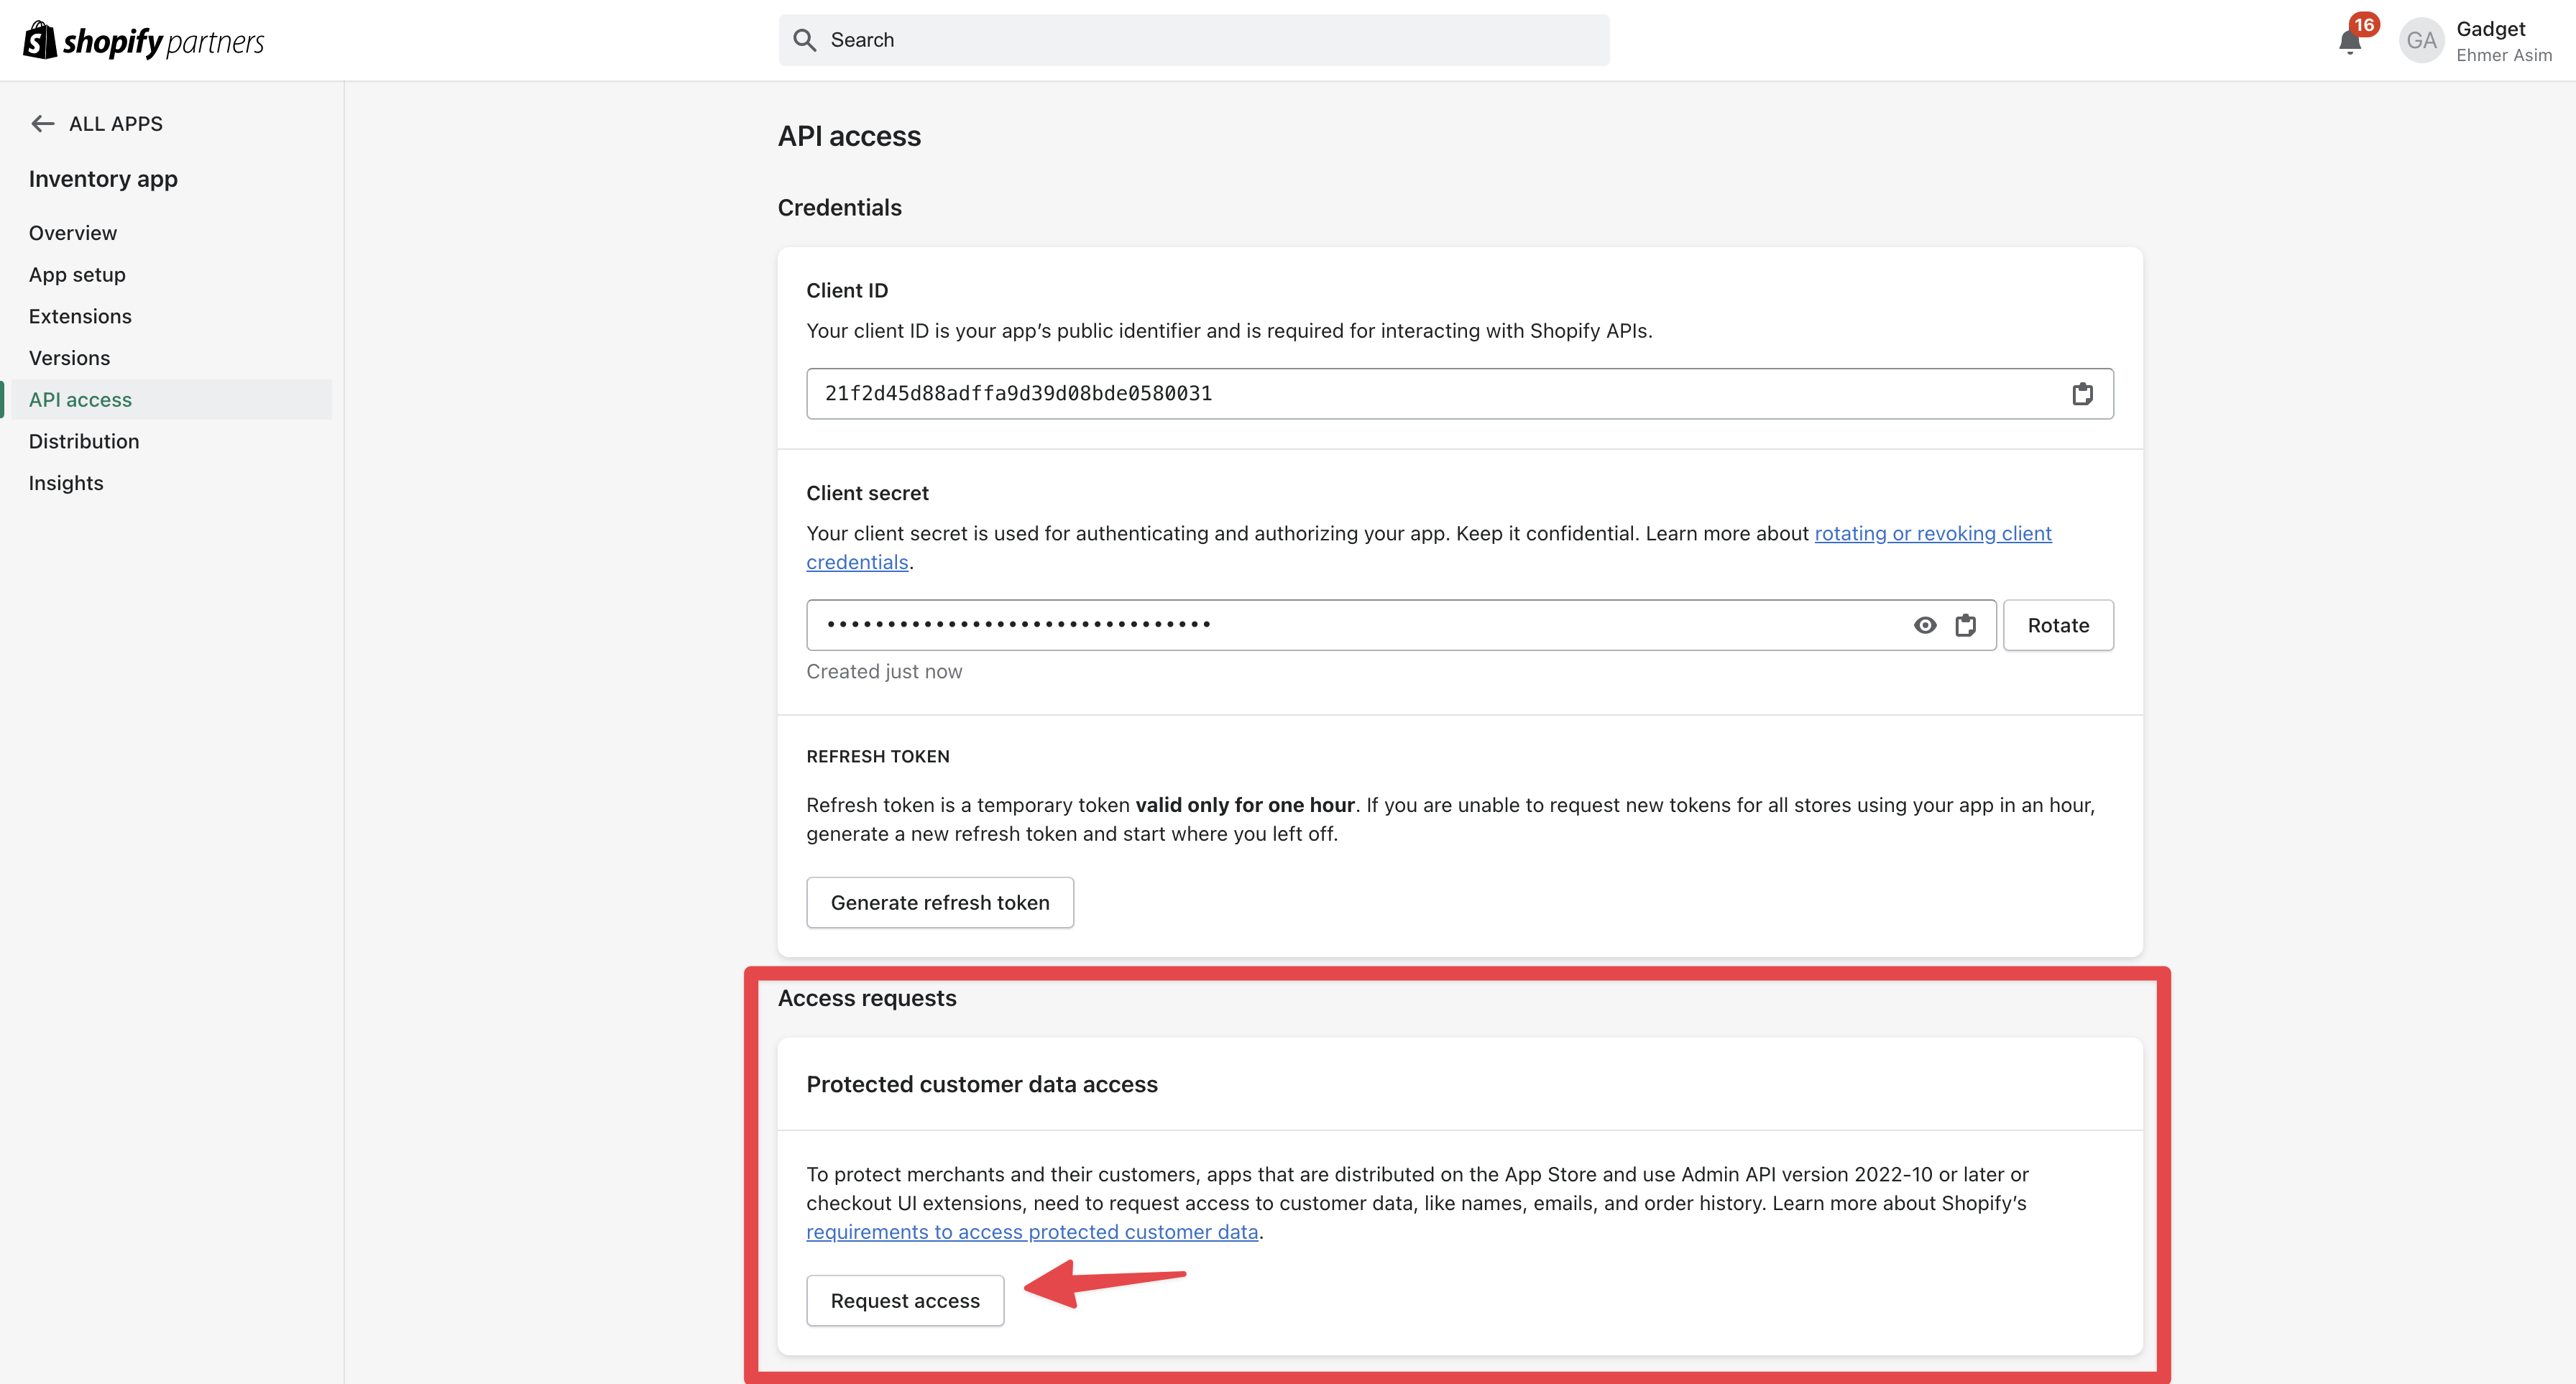
To request access to protected customer data:
- Go to your app's page in the Shopify Dev Dashboard.
- Select a distribution method. This will bring you to the Shopify Partner dashboard.
- Click on API access requests in the left nav and find the section labeled Protected customer data access. Fill out the form.
See Shopify's documentation for more details.
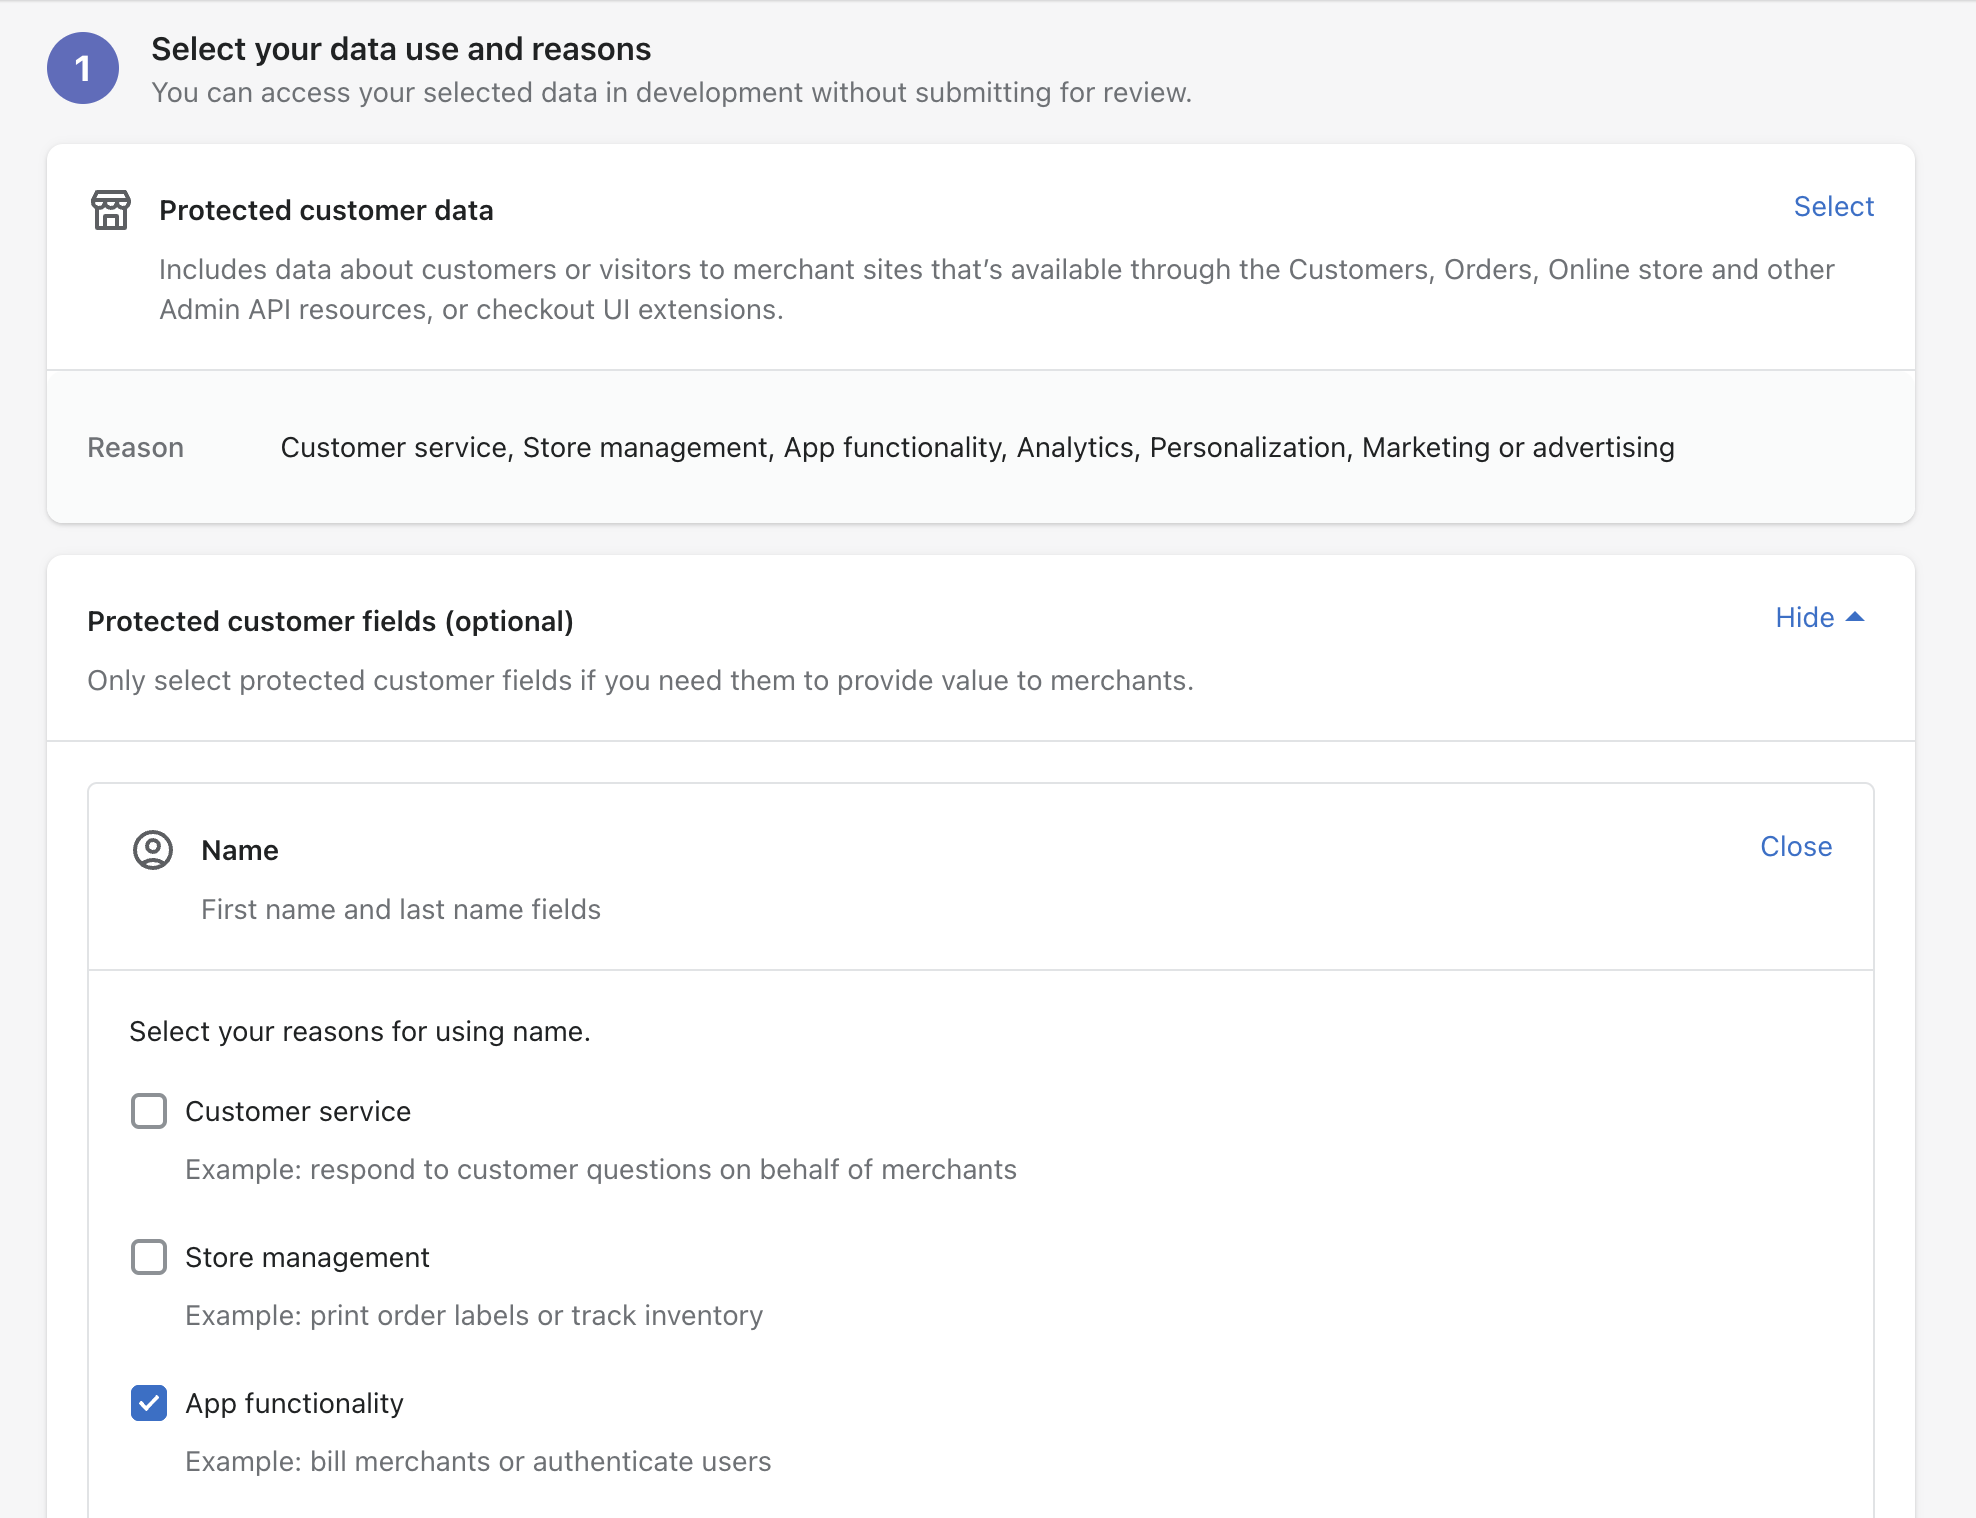
If your app needs access to fields such as customer name, email, phone number, or address, you need to make sure you request individual field access in the optional Protected customer fields section of the customer data access page. If you do not select the individual fields you need access to, Shopify will not send this data via sync or webhook, and the records in your Gadget app database will have null or empty values instead.
Installing your app on a dev Store
When testing your Shopify app, you can only install it on development stores that have been specifically set up with transfers disabled. This is because development stores that can be transferred to merchants have specific limitations around app installation.
You can set up a new development store for testing on the Shopify Dev Dashboard.
Gadget will also redirect you to the development store creation form if you set up a Shopify connection without a development store in your Shopify organization.
If you try to install your app on a development store that was created with transfers enabled (i.e., created using "Create a store for a client" option), you'll need to select a distribution method for your app first. This is a Shopify requirement to ensure proper app distribution and merchant experience.
For more details about development store types and their limitations, see Shopify's documentation on development stores.
Note: Development stores created for testing cannot be transferred to merchants later, so make sure to choose the correct type of development store based on your needs.
Adding code to actions
Shopify models can be given business logic just like any other model in Gadget using model actions. Most often, developers add code to the onSuccess function of the default model actions (create, update, or delete) on a Shopify model.
Within action functions, you have access to:
- the current
recordbeing manipulated - the incoming
paramsfrom webhooks - your
apiclient object for fetching or changing other data in your app - the
connectionsobject for making API calls back to Shopify
plus other information provided by the action context.
Note: Gadget's sync logic replicates changes made in Shopify to your Gadget app, but not the other way around. If you want to update Shopify data, you must make explicit API calls to the Shopify API to do so.
Let's say we wanted to build an automatic product tagger for Shopify products. When a product is changed in Shopify, our Gadget app should parse the product body, extract some new tags, and send them back to Shopify so customers can search for the product on the storefront easily. To do this, we can add code to the shopifyProduct model's update action:
The above code extracts tags from the product's body field using a module from npm, gets an authenticated API client for working with a specific Shopify shop's API, and then updates the product by making a call back to Shopify using that client.
Accessing the Shopify API
Follow our tutorials and learn how to connect Gadget and Shopify in just a few minutes!
Gadget provides a helper for quickly accessing a client API object for communicating with Shopify. Gadget uses the shopify-api-node library as it is battle-tested, has good coverage of the Shopify API, and has support for automatic retries to avoid the Shopify API rate limits.
To access a Shopify API client, use the connections.shopify object in your action code. connections.shopify is a helper object with some handy functions for accessing already-created API Client objects:
connections.shopify.currentreturns a Shopify API client for the current shop if there is one in context. For Public Shopify apps making requests from an embedded app, Gadget is able to track the shop making the request and populate this value.connections.shopify.forShopIdallows creating aShopifyclient instance for a specific shop IDconnections.shopify.forShopDomainallows creating aShopifyclient instance for a specific myshopify domain.
For example, we can use connections.shopify to access a Shopify client for a given store and then make a call to the Products GraphQL API in Shopify to create a new product record:
If you prefer to use another client, the provided client has the necessary token information:
Querying Shopify's GraphQL API
The shopify-api-node library has a graphql method that allows you to make GraphQL queries to Shopify.
Here's a simple example that queries for the current shop's name:
This is a more complex example that creates a new discount for the current shop:
When to make API calls to Shopify in actions
Reading data: Prefer reading from your Gadget database to avoid rate limits and improve performance.
Writing data: Place API calls in the onSuccess function. Gadget executes the run function inside a database transaction. If run fails, database changes are rolled back. Since Gadget cannot roll back changes to external systems like Shopify, API calls made in a failing run function will persist, potentially causing your systems to get out of sync.
Managing Shopify API rate limits
Shopify has restrictive rate limits, limiting apps to making as few as 4 requests per second to any given shop.
The best way to avoid rate limits on read is to read data from your Gadget database. Gadget's Shopify connection syncs data from Shopify to your Gadget database so you can read quickly and without rate limits.
When writing to Shopify, or to query data manually, use Gadget's built-in background actions to intelligently manage rate limits. When a background action is enqueued with shopifyShop context, Gadget will automatically use the adaptive rate limiter to manage the requests made to Shopify for that shop.
There are two ways to enqueue a background action with shopifyShop context:
- enqueuing an action that call the Shopify API, which is required when you need to manipulate the result of a Shopify API call in your action.
- enqueuing a Shopify GraphQL query directly, which is best when you do not need the result of the Shopify request, and just want a resilient write to Shopify.
It is important to understand the difference between these two methods and when to use each.
Enqueue a background action that calls the Shopify API
This will enqueue the entire action. It will be run when Gadget's adaptive rate limiter determines it is most likely to not hit Shopify's rate limits. Once the action is dispatched, the action behaves and runs normally.
Use this when you need to manipulate the result of a Shopify API call in your action.
There is still a chance that you get a 429 response when your action runs and calls Shopify.
Enqueuing an action with shopifyShop context works best when the action calls Shopify right away. If an action has
additional requests and long running processes that occur before calling Shopify, try to split up the work and enqueue the Shopify request
with shopifyShop context separately.
Enqueue a Shopify GraphQL query directly
This is useful for resilient mutations and writing data to Shopify. If you do not need to manipulate the result of the Shopify request, this is the method you should use to hook into the managed rate limiter.
Gadget uses a PID (Proportional-Integral-Derivative) controller to dynamically adjust the rate of requests sent to Shopify. The controller monitors the Shopify API's response times and error rates, and adjusts the request rate in real-time to maximize throughput without exceeding the limits.
Manually handle rate limits
The shopify-api-node object returned by Gadget's connections.shopify helper is also pre-configured to retry when encountering rate limit errors. shopify-api-node will retry requests, respecting Shopify's Retry-After header.
The number of times connections.shopify will retry a request is configurable. By default it will retry 2 times (or 6 times if your app is on a Gadget version prior to v1.1). If you would like to configure how many times it will retry you can do so on an action-by-action basis.
When connections.shopify retries a request to Shopify, it will wait for the Retry-After header to determine how long to wait before
retrying. This can lead to a request taking longer than expected to complete and increase the amount of request time your app uses. If you
are repeatedly hitting Shopify's rate limit you may want to consider running your action as a background
action to make sure that you are only running actions when it likely that they will succeed.
Current shop tenancy in actions
As the frontend is making queries and performing mutations on the data in your Gadget application, it is important to make sure that cross-talk between different shops is not allowed. This is especially relevant for public Shopify apps.
The context of the current shop is determined by the user and session making the request, or, if the action is triggered by a webhook or sync, the current record that is being processed.
The following information about the current shop is accessible from the connections.shopify object supplied in the action context:
| The shop id of the current shop |
| The myshopify domain of the the current shop |
| The client ID of the Shopify app that the current shop installed |
| The client secret of the Shopify app that the current shop installed |
| The Shopify session token that was used to authenticate the current shop for the current request |
| The Shopify user id attached to the Shopify session token that was used to authenticate the current shop for the current request |
It is preferred to use connections.shopify.current in actions to prevent any cross-talk between shops. You can then use the shopify-api-node API off of the current shop to interact with the current Shopify store.
It can also be useful to understand how filtered model permissions work in Gadget, as they determine what default filters, such as shopId in the case of a public app, are applied to GraphQL queries and mutations made through your application's API.
Current shop tenancy in HTTP routes
If you are looking to get the current shop's context in a custom HTTP route being called from an app embedded in the Shopify admin, you can use the useFetch hook from @gadgetinc/react or the Gadget client's api.fetch method. You can then access the current shop id in your Gadget route.
You may be able to use a Global Action instead of an HTTP route. One advantage to Global Actions is that they are included in a Gadget project's generated GraphQL API, so shop tenancy for an embedded app is handled automatically. For more differences between global actions and routes, see global actions vs HTTP routes.
Here's an example of how we can do this in a React component from an embedded Shopify app:
The current Shopify store id can be accessed in a Gadget route using request.connections.shopify.currentShopId. The current session is available in a route file with request.applicationSession.
The current shop connection can be used to make API requests against the Shopify store that sent the request to the route.
By default, the Gadget API request.api object will be able to read model records across shops. You can use the current shop id as a filter if you only need a single shop's data in your route code.
Accessing the current Shopify user
To customize your embedded app experience based on which user is accessing your app through the Shopify admin, create an action to exchange the current Shopify session token for information about the current user.
This action can then be called from your embedded app frontend using useGlobalAction.
Webhook infinite loop handling
It is common for Gadget actions running in response to a webhook to make calls to Shopify, which then trigger the same webhook a second time. In the example above, we're processing an update Action on a product record, and within it, we update the same product record again using the Shopify API. This triggers a second product/update webhook, which will dispatch the same Gadget Action and run. Without care, this can cause infinite webhook loops, which chew through your Shopify API rate limit and Gadget resources.
To avoid webhook infinite loops, you must ensure that your code doesn't re-process the changes it makes and re-trigger webhooks forever. The best strategy for detecting this is to only trigger your business logic if the fields you care about have changed on the record instead of always doing it when any field changes. The record object in the function parameters is a GadgetRecord object which reports which fields have been changed by the incoming webhook payload, and which have not.
In the example above, we only need to extract new tags for the product when the product's body field has changed. If anything else changes, we don't need to change the tags, as they purely come from the body, so we wrap our business logic in a check for if (record.changed("body")). This way, when we make the API call to update the product's tags in Shopify, Gadget will receive this webhook and dispatch the update Action, but our code won't run twice, as record.changed('body') will be false, as we only updated the record's tags.
More details on the GadgetRecord changes API can be found here.
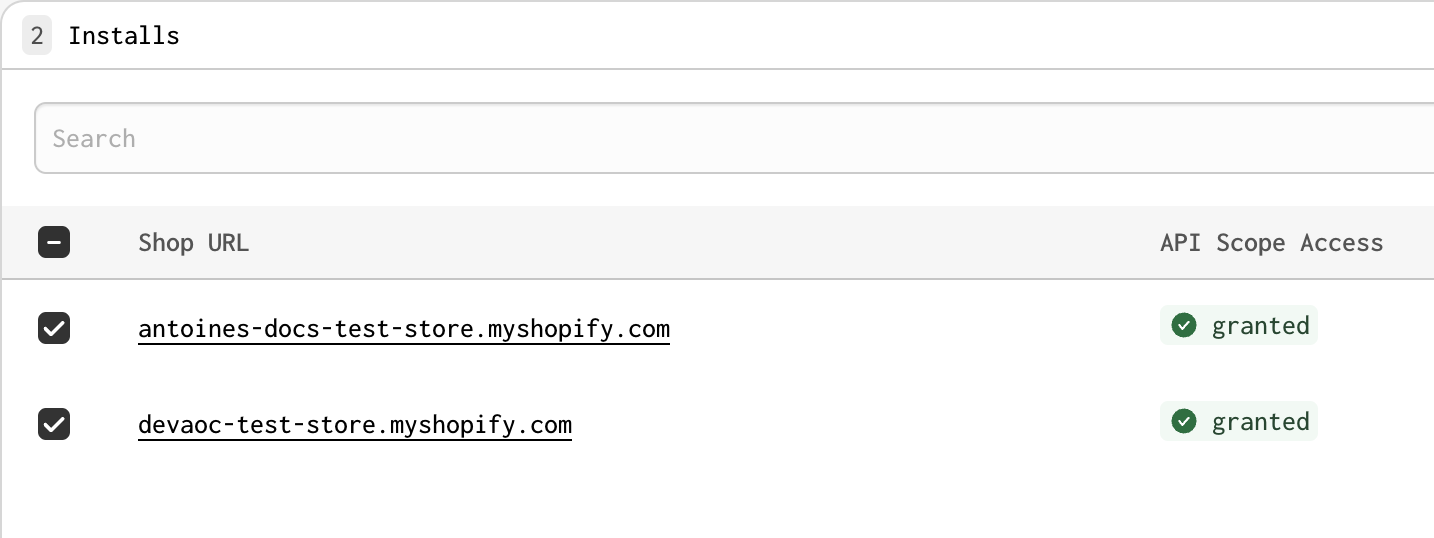
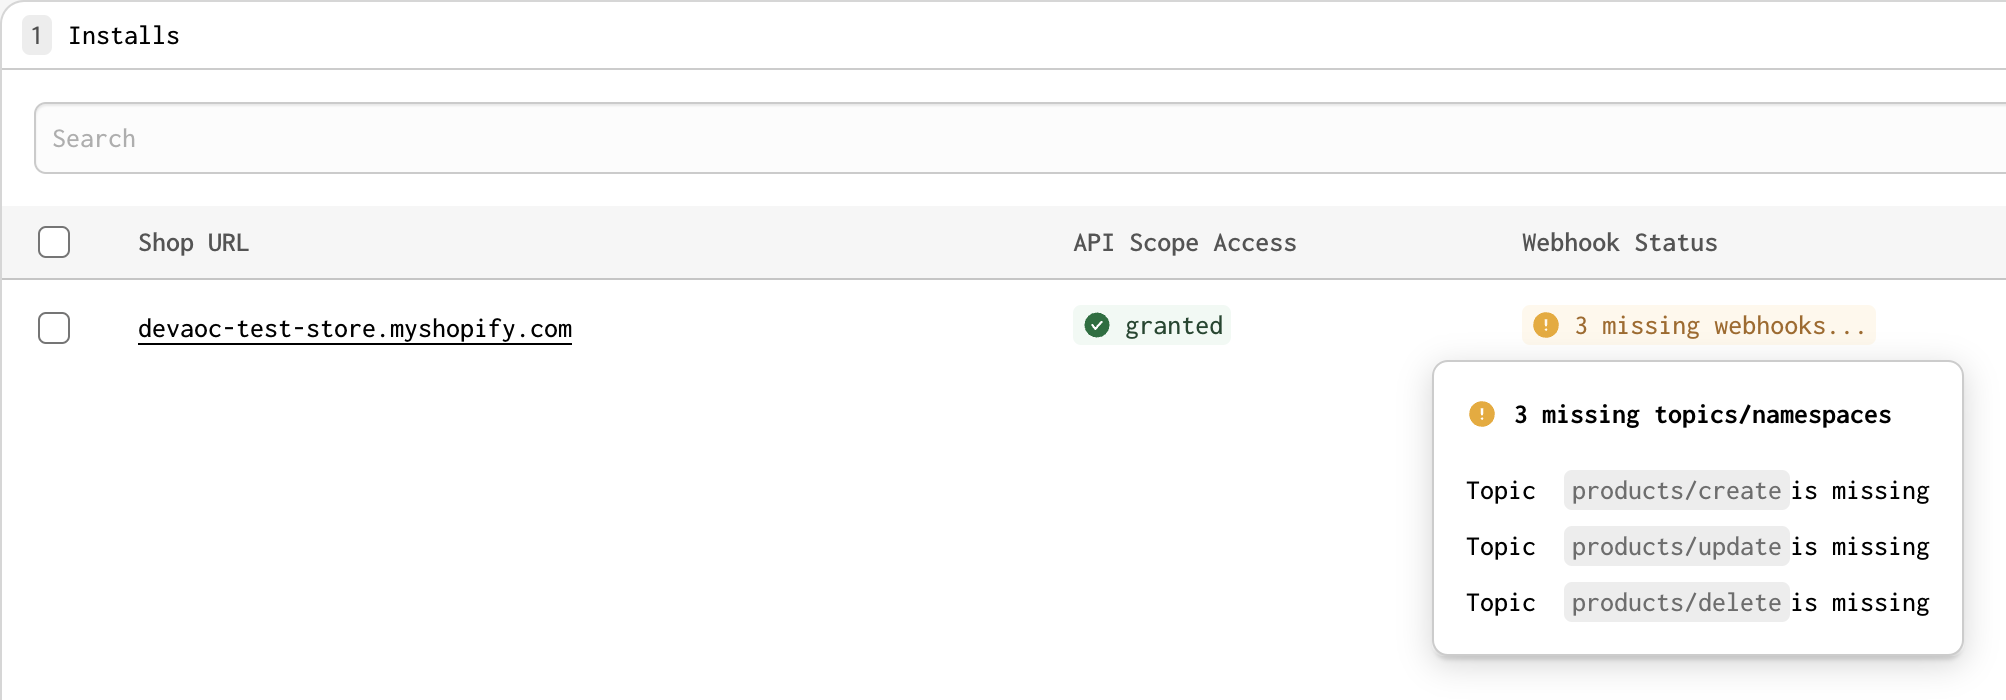
Shop installs
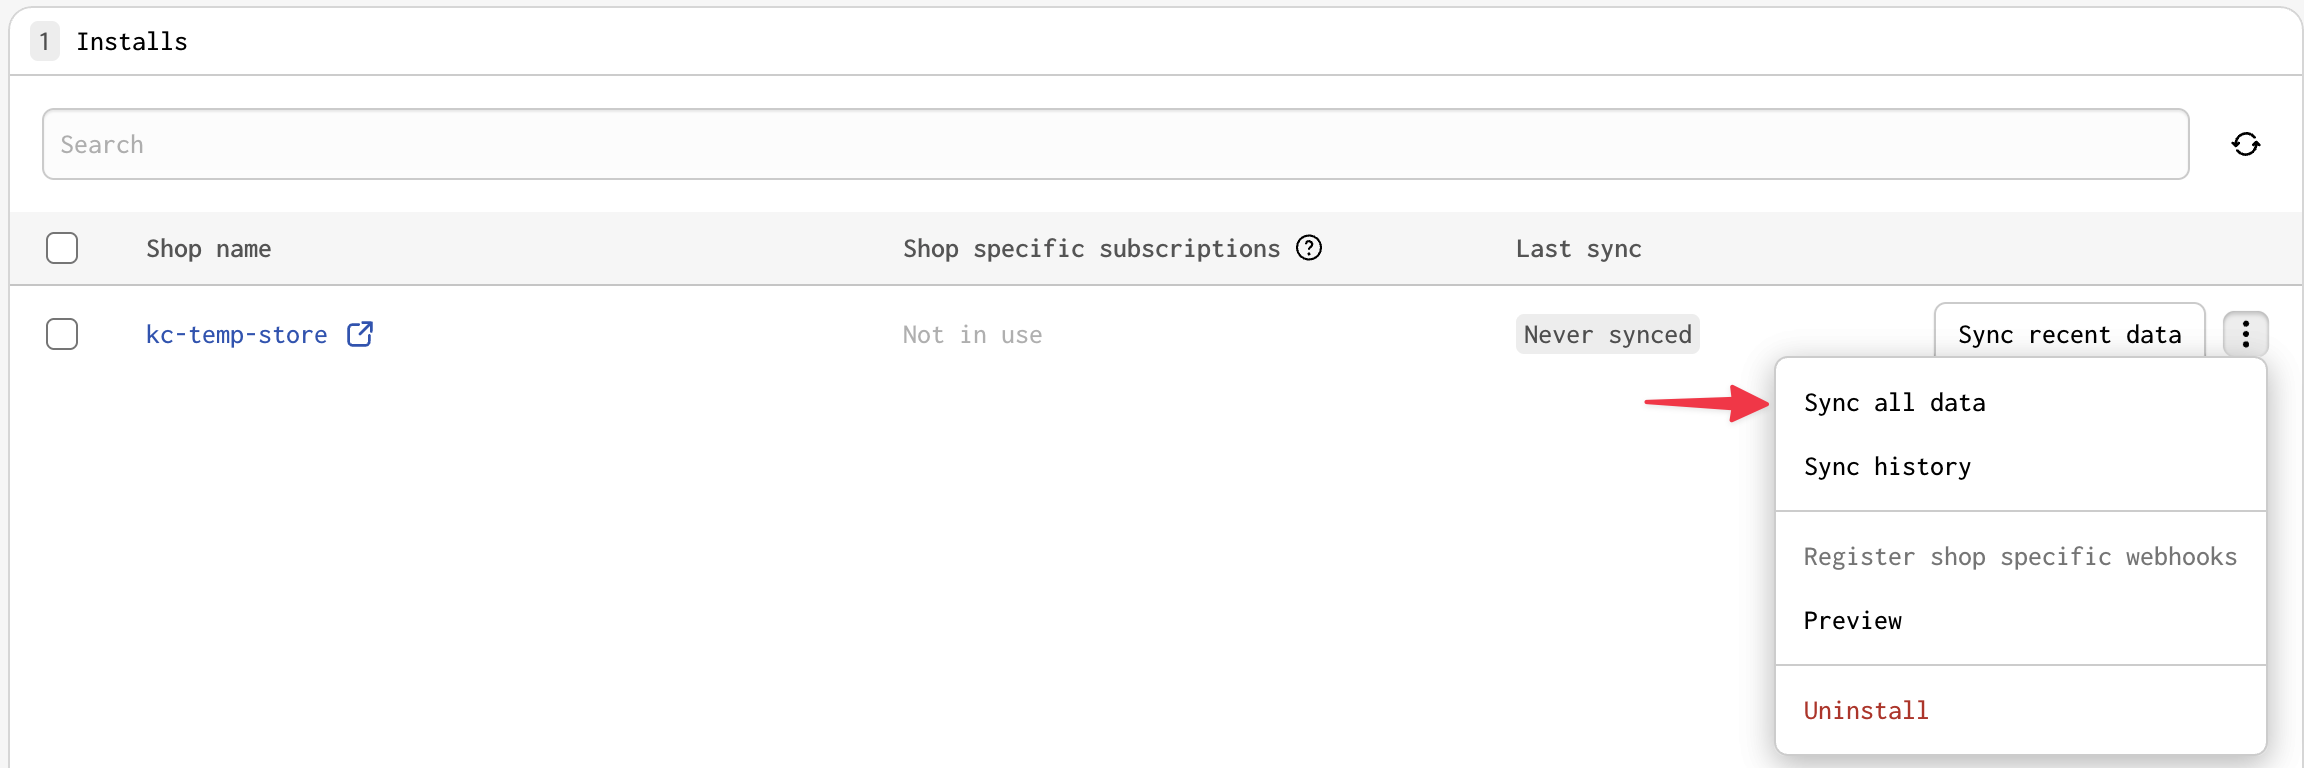
You can click Installs to view the shops that have installed your application. The Installs page can be found on the left nav bar, or by clicking Settings -> Plugins -> Shopify -> Installs. This page also allows you to manually Sync data per store or view Sync History.

You can click the Sync button to sync a single store. Expanding the options for a single store allows you to view the Sync History, Register Webhooks, or Uninstall your app from that store.
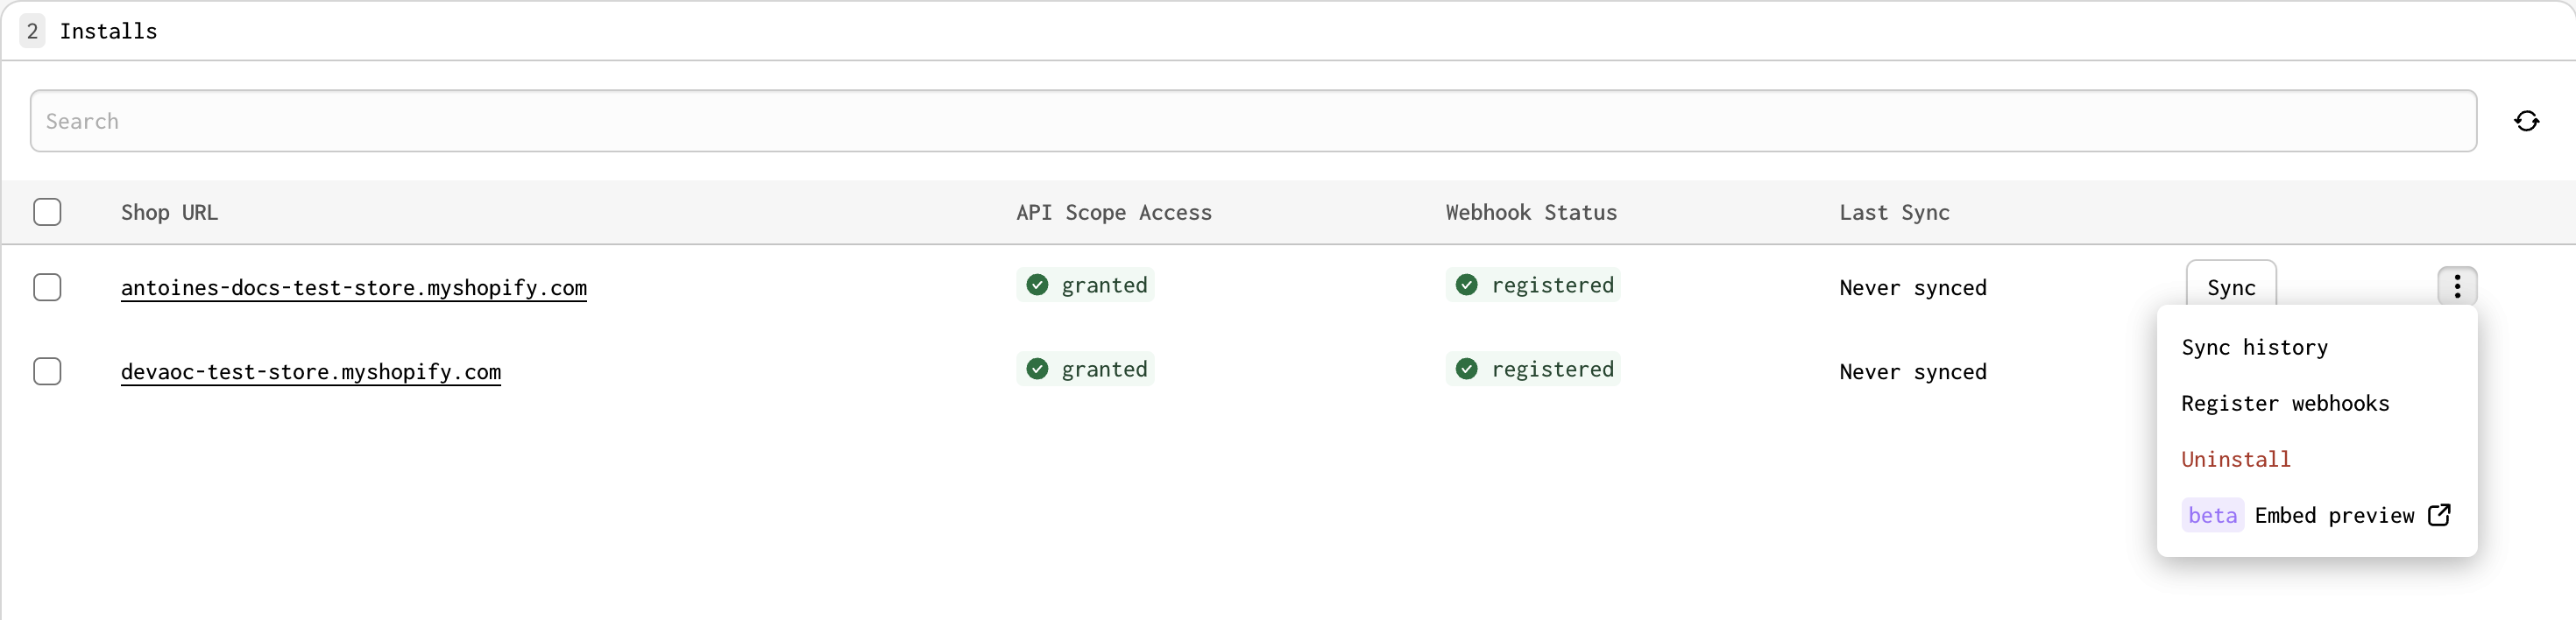
You can also perform operations on multiple stores at once by selecting multiple stores and then clicking Sync or Register Webhooks buttons.
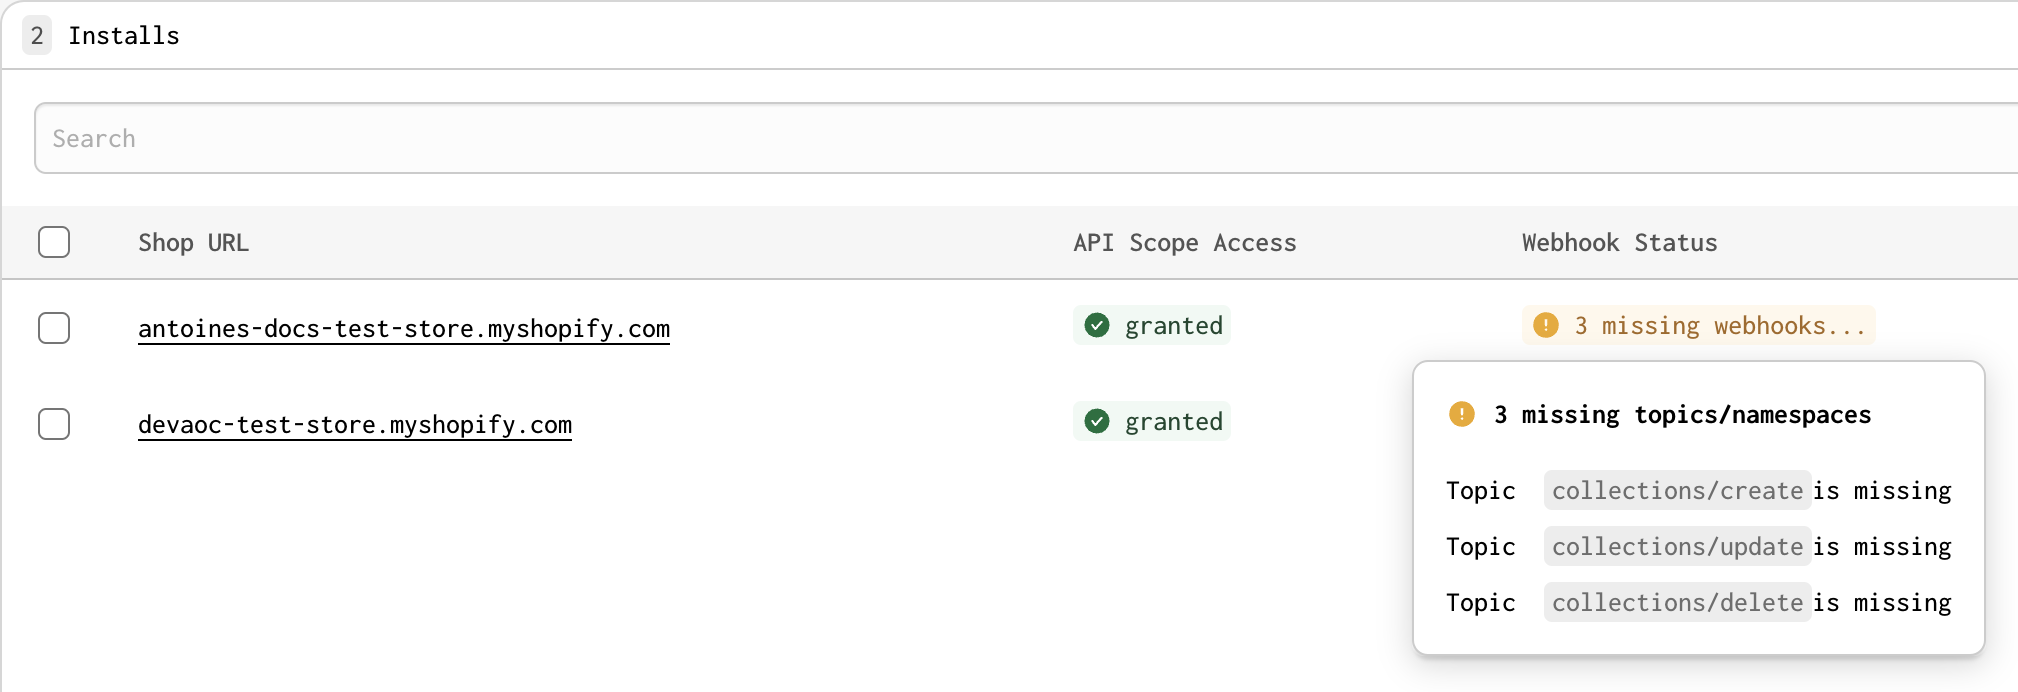
The Installs page also lets you know if you are missing access scopes on your store or if you are missing topics/namespaces for your registered webhooks.
To fix missing access scopes, the merchant who installed the application needs to grant access to the scope in the Shopify Dashboard.

In most cases, selecting Register Webhooks from the store options button or clicking Register Webhooks with multiple stores selected should fix missing webhook topics. If you are editing a connection that includes new models, you need to grant additional scopes before the new webhooks can be registered. The Register Webhooks button will also not handle missing checkouts_create and checkouts_update webhooks at this time.
There are two ways to associate a Shopify store with a custom app:
- Through a merchant install link.
- Through the Installs section on your app's Home page in the Shopify Dev Dashboard. Both of these will start Shopify's installation flow, where the user has to authorize your app to be able to access its data.
Once authorized, your connection is now associated with that store. You should see the shop's name and domain on the Installs page, and the sync button should now be available so that you can get the shop's data into Gadget. You can repeat the above process if you need to connect to another store, which you would typically do to allow installation on both a development store and the associated merchant store.
Editing Shopify connections
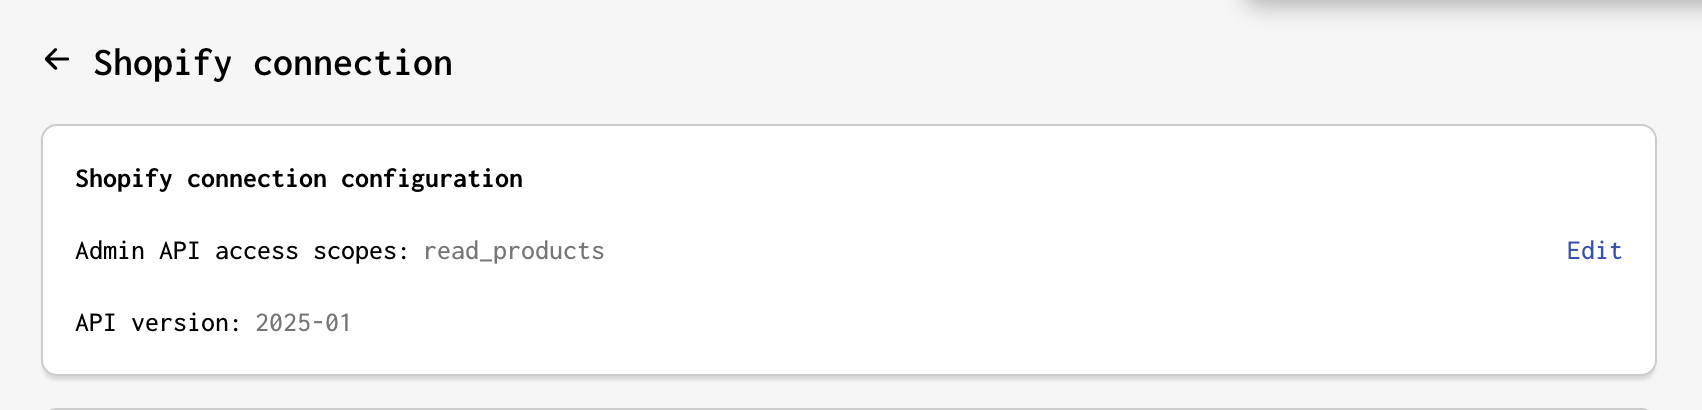
You can also edit your connection using the Edit button on the Shopify connection page (Settings > Plugins > Shopify). This allows for changes to be made to the Shopify scopes and models that your application can access and import.
Adding new scopes
If you are building a custom Shopify app and modify the required Shopify OAuth scopes, you will need to reauthenticate for all stores on which the app is installed.
If you are building an embedded application using React, and use the Gadget Provider from our @gadgetinc/react-shopify-app-bridge package, re-authentication will be handled for you when you open the app in the store's admin page.
If you are not using the Gadget Provider, you will need to handle re-authentication yourself. To do this, you can go through the app installation process again. This involves re-installing your app on development stores in the Dev Dashboard.
If you have an application built through a store admin, you must ensure that the scopes selected in the admin match the scopes required by your Gadget connection. If they are out of sync, navigate to the Installs page. From there, you can click the Sync button to the right of the store you are trying to sync. You may also need to reregister your webhooks.
Adding new models without new scopes
You might edit your connection to only add new models, not new scopes. In this case, you do not need to reauthenticate or reinstall, but you may need to register new webhooks for your newly selected models. You can check to see if you need to register webhooks on the Installs page.
For example, you might have a connection set up that has the read_products scope selected along with the Product model. If you edit your connection to include the Collection model, you do not need new scopes, but you need to register the collections/create, collections/update, and collections/delete webhooks manually.
To register webhooks, you need to go to the Installs page for your Connection in Gadget, click the More button (…) for any stores you have re-authenticated on and select the Register Webhooks option.

Once the webhooks are registered, you are ready to continue building your app using the newly selected scopes and models.
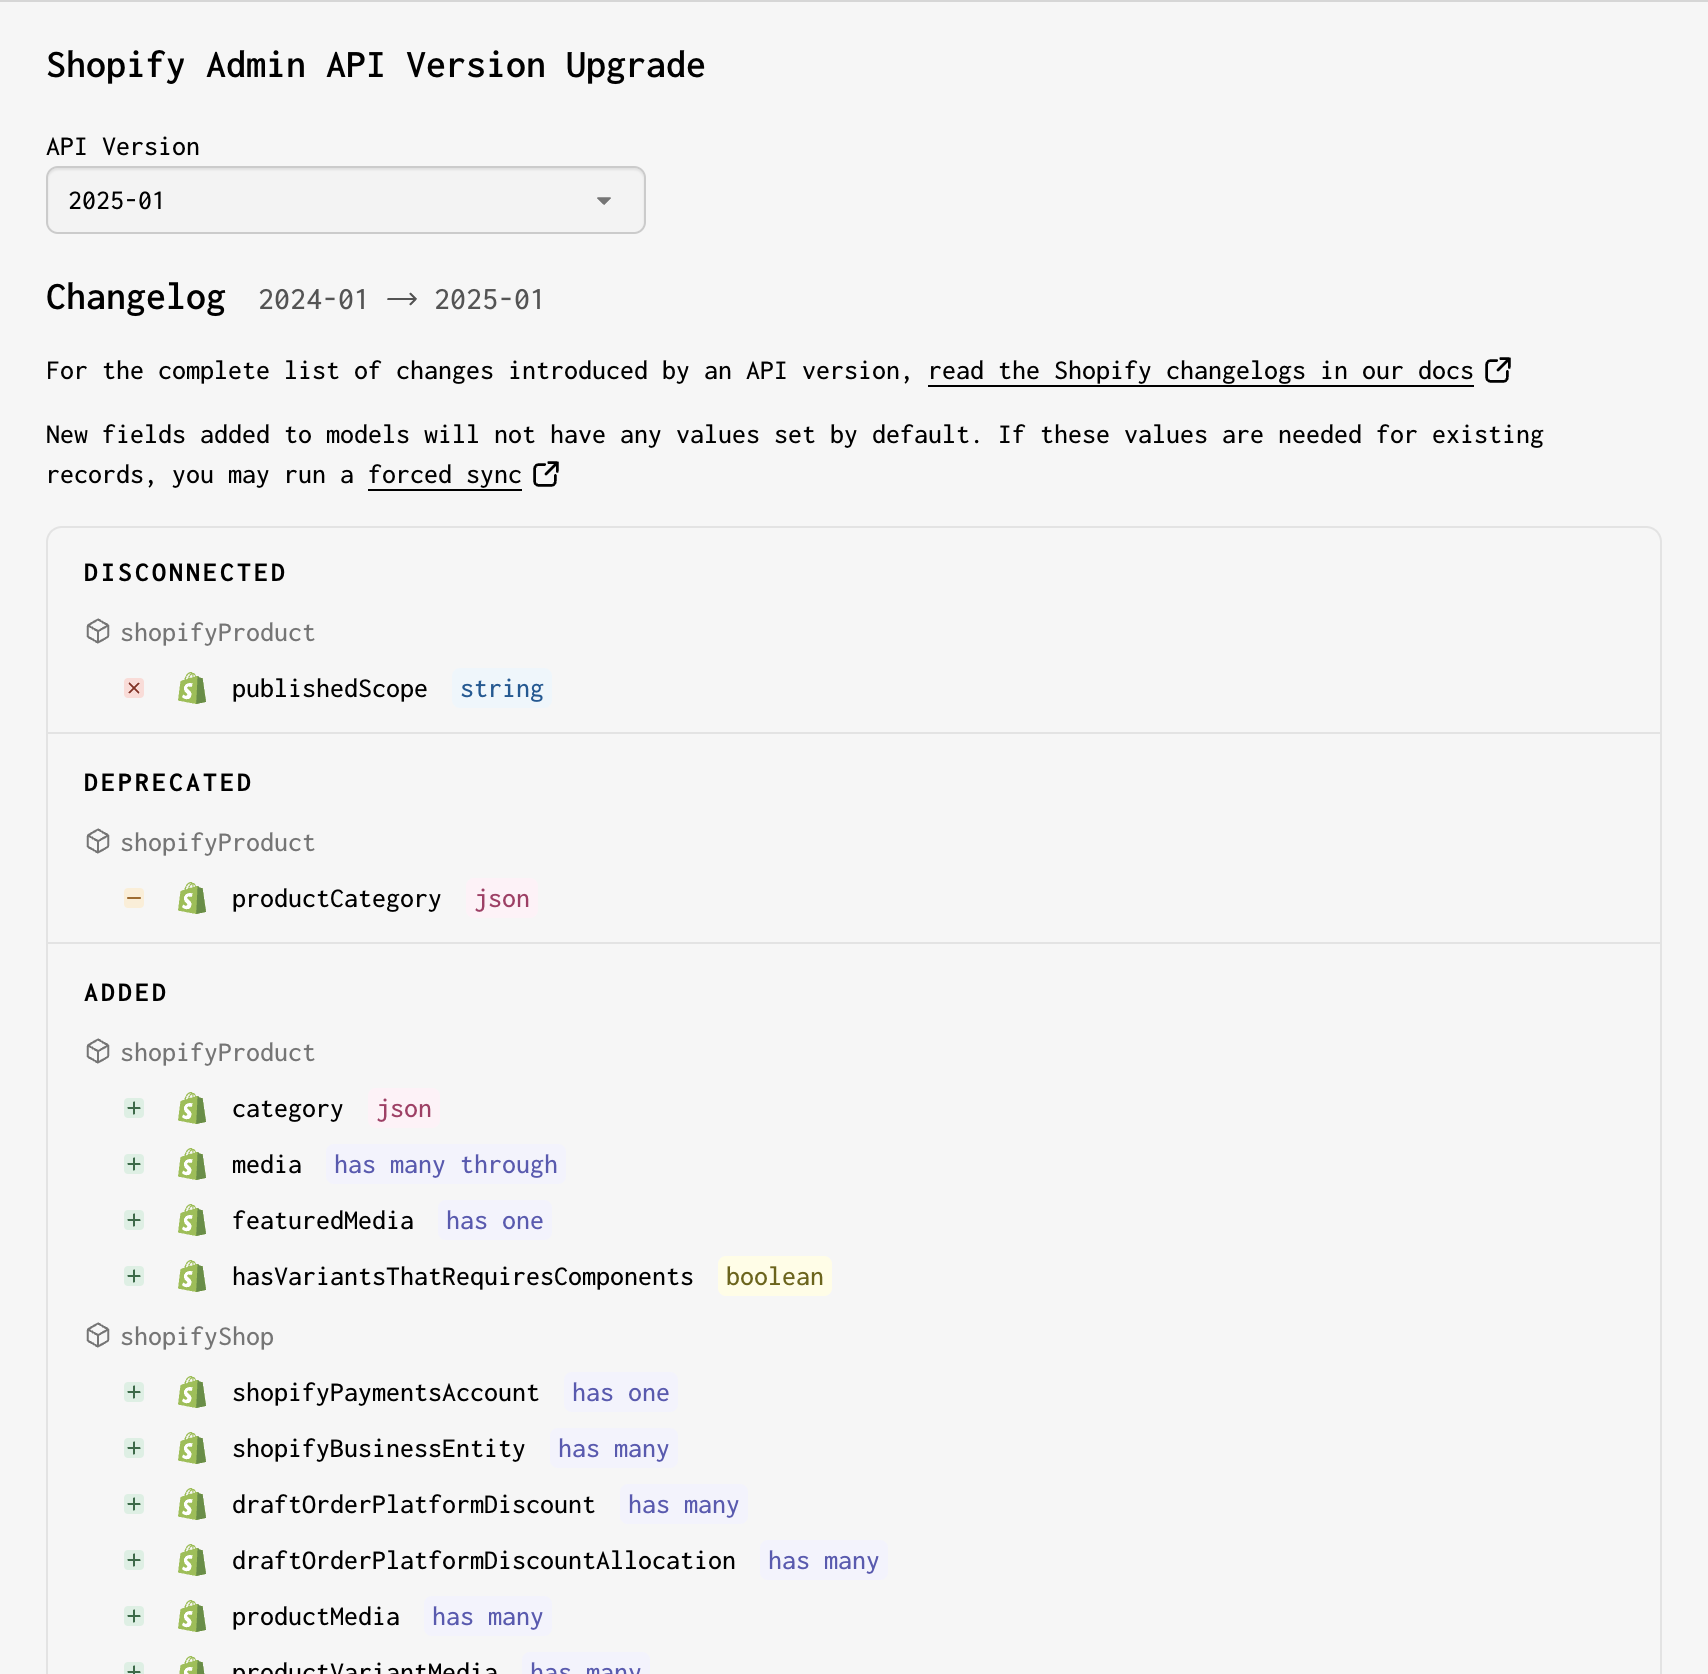
Upgrading the Shopify API version
Shopify releases a new API version every 3 months at the beginning of the quarter, and each stable version is supported for a minimum of 12 months. This generally means that a given version will become unsupported 12 months after its release. Shopify recommends upgrading your apps to make requests to the latest stable API version every quarter. Gadget makes this process simple by allowing you to edit your Shopify connection's API version.
To upgrade the API, go to Settings and click Plugins, and select Shopify under Connections. There you will see the current API version and a link to upgrade.

Click on Upgrade and select the API version that you would like to upgrade to. Note that downgrading API versions is not currently supported.
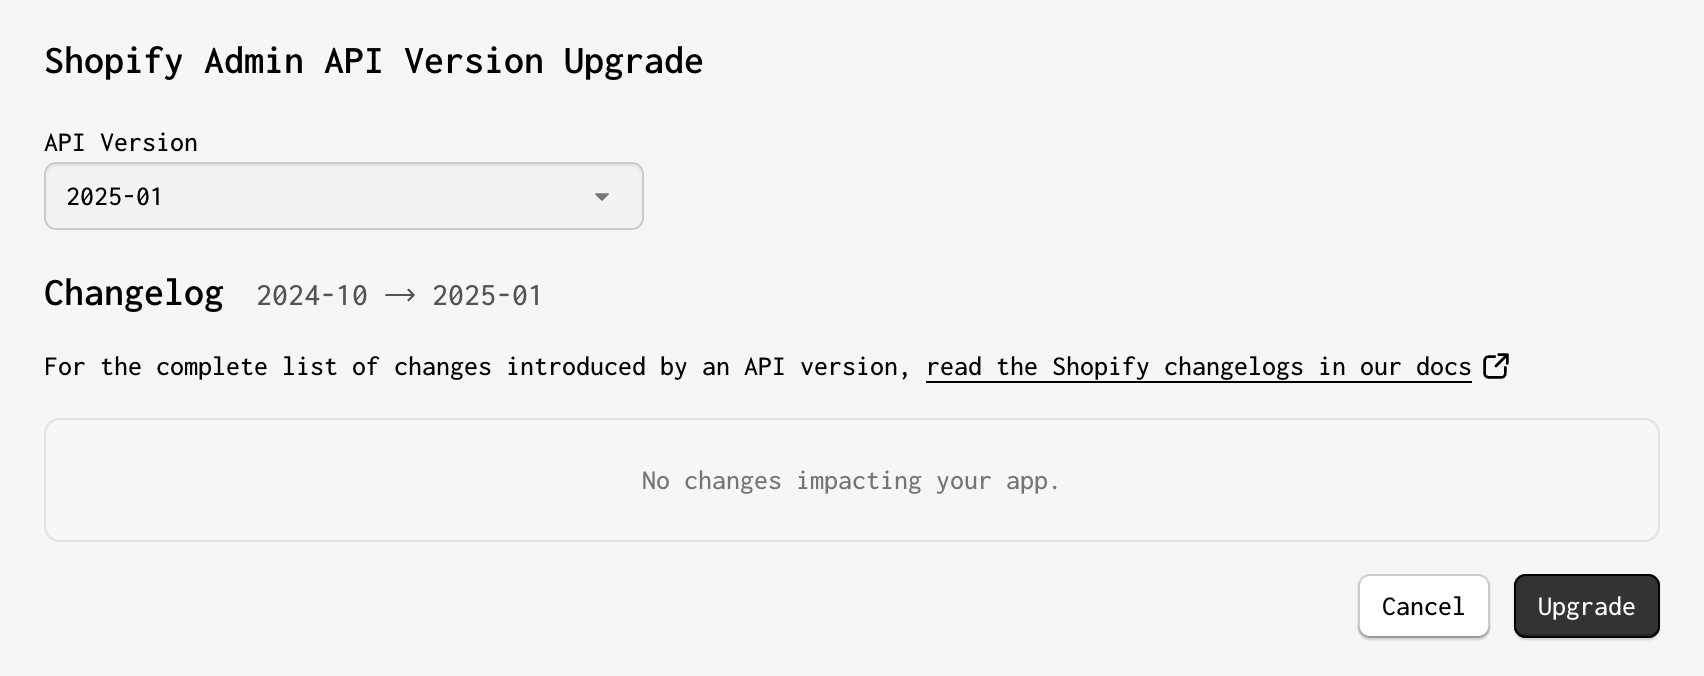
Once an API version has been selected, the page will display:
- Added - fields that have been added to models.
- Deprecated - fields that Shopify has marked as deprecated in the API version.
- Modified - an enum value has been added to a field or field type has changed.
- Disconnected - fields that have been removed by Shopify which Gadget will now allow you to manage yourself. Gadget will never delete fields that Shopify has disconnected! However, these fields will no longer be updated via Shopify webhooks or the nightly sync.
Click on Upgrade and then Confirm to complete the API version upgrade.
You should ensure that the Webhooks API Version specified in the Dev Dashboard or Admin App Configuration page is set to the same version.
After upgrading your API version, you may wish to backfill existing records with new values by running a forced sync.
Shopify GDPR and privacy compliance
For apps listed in Shopify's public app store, Shopify requires apps to meet mandatory minimum privacy rules, which includes implementing GDPR webhooks Shopify will send your app.
Read more about Shopify's privacy compliance rules in Shopify's docs.
Gadget's infrastructure meets Shopify's requirements for secure processing of data, but you must take two additional steps to be compliant with Shopify:
- Subscribe to Shopify's compliance webhooks in your app's
shopify.app.toml.- These changes must be deployed to your Shopify app. Open the terminal in the Gadget editor and run
yarn shopify app deployto deploy the changes. If you are building your Gadget project locally, use your local Shopify CLI to run the sameshopify app deploycommand.
- These changes must be deployed to your Shopify app. Open the terminal in the Gadget editor and run
- Add custom code to the actions in your
shopifyGdprRequestmodel to purge data upon request from a merchant or customer.
GDPR requests
Gadget supports processing GDPR request webhooks from Shopify using the shopifyGDPRRequest model. The Shopify plugin includes webhook URLs that you can paste into shopify.app.toml (or shopify.app.<environment>.toml).
- The following should already be included in your
shopify.app.tomlfile to subscribe to GDPR/compliance webhooks:
compliance webhook definition in your shopify.app.toml filetoml[[webhooks.subscriptions]] compliance_topics = ["customers/data_request", "customers/redact", "shop/redact"] uri = "https://<your-app-name>.gadget.app/api/webhooks/shopify"
- In the terminal in the Gadget editor, run the
yarn shopify:config:use:productionto specify theshopify.app.tomlfile for your production environment. - Deploy the changes by running
yarn shopify app deployin the terminal.
After this config is deployed, incoming GDPR webhooks will trigger the actions on this model. It's up to you to add code that correctly deletes data within your application to honor Shopify's privacy rules.
See the example code within the actions on your shopifyGdprRequest model for guidance on how to process these incoming webhooks.
Storefront requests using Shopify app proxies
You can use Shopify app proxies to securely call your app's API and provide dynamic data to a storefront. This could include calling an app's actions or HTTP routes from a Liquid theme block, theme app extensions, or checkout UI extensions.
Gadget automatically handles the HMAC validation on app proxy requests. Store context and the logged_in_customer_id are also maintained, and are available on the session parameter in actions and HTTP routes.
Setting up an app proxy
To set up an app proxy:
- Add a proxy definition to your
shopify.app.<environment>.tomlfile, for example:
- Install your app's API client on the storefront and set an
endpointto the proxy/<prefix>/<subpath>, for example:
- Then use
window.exampleAppClientto make secure calls to your app's actions and HTTP routes:
Initializing your API client can also be done in a JavaScript asset files in both themes and theme app extensions.
Shop context in proxied requests
In actions and HTTP routes, the session and connections parameters will have the context of the shop making the request through the app proxy.
Requests from the storefront will be made with the unauthenticated role. Actions that are not permitted to be called by unauthenticated users will return a GGT_PERMISSION_DENIED error.
Gelly tenancy filters on actions will also be applied using the shopId.
Customer context in proxied requests
If the app is also using customer account authentication, and Shopify sends a logged_in_customer_id in the app proxy request, then the customer ID will be available on the session and the action will have the shopify-storefront-customers role: