For most server side work, Actions should be preferred over routes to offload your boilerplate code to Gadget.
HTTP routes
What is an HTTP route in Gadget?
An HTTP route is a server-side function that runs when a URL is visited to produce a response. Gadget matches incoming requests to routes based on each route's URL pattern, and then runs the handler function and sends the reply. Routes in Gadget are constructed using Fastify routes, which means your handlers can use all of Fastify's capabilities including body parsing, validation, middleware support, and the Fastify plugin ecosystem.
When do you use an HTTP route in Gadget?
HTTP routes are used as an alternative solution to Actions when you need to specifically control the request input and output formats. Usually, Actions are the preferred way of working with your app, as you get an auto-generated, typesafe, performant API for each Action out of the box. HTTP routes work better when you need low-level control, like:
- handling webhooks from connections not provided by Gadget (Ex. Stripe or Twilio)
- dynamically generating files (Ex. PDFs or images)
- serving static files
For example, if you wanted to send an SMS every time a Shopify Product is created in a store, you would use a model action because Gadget has a connection that handles triggers for Shopify's webhooks. But, if you wanted to send an SMS when Stripe sends you a specific webhook, you'd listen to that webhook with an HTTP route and trigger your logic there.
How an HTTP route works in Gadget
HTTP routes in Gadget are defined as files in the routes folder. Each route has a specific filename which determines the URL path the route will be called at, like GET-hello.js or /[slug]/POST-[id].js. The route will be called whenever a request is made to a URL matching the pattern in the filename.
HTTP routes run in your application's serverless runtime environment. Read more about the Gadget runtime environment in the Runtime environment guide.
Route files export a single function accepting a request context object. The request context includes:
- a
requestobject for inspecting the incoming request headers, body, etc - a
replyobject for managing the response - a variety of other objects for working with your backend
How to add an HTTP route to Shopify apps in Gadget
Unlike the default web app template, when building a Shopify app (by choosing the Shopify template) it does not come with HTTP routes and its corresponding folder.
To create an HTTP route in a Shopify app:
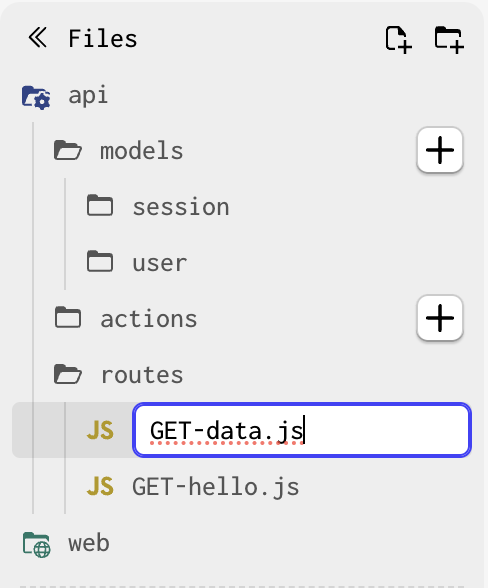
- Press CRTL and click on the
APIfolder and select New folder.

- Name the folder
routes. - Add a new JS file to the
routesfolder (for example we'll addGET-data.jsas seen below).
- In the newly created file you then should see the default code below:
Update the route so it returns a response:
Calling the route
You can now call this route at the /data path. For example:
https://your-app-domain.gadget.app/datain productionhttps://your-app-domain--development.gadget.app/datain development
If you visit that URL in your browser, Gadget runs api/routes/GET-data.ts and returns the JSON response.
If you are calling the route from a Gadget frontend, use useFetch or api.fetch so the request includes the right authentication headers. For example:
For more details on route paths, see Route structure. For more details on calling routes from a frontend, see Building frontends.
You can only create routes within the file directory path of api/routes.
Adding a routes folder or creating a routes file anywhere else within your Gadget app will not add a new HTTP route to your application.