Working with Shopify webhooks
Shopify webhooks within model actions
Shopify webhooks within model actions in Gadget ensure your application is kept up to date with the latest Shopify store data.
When an event occurs in your Shopify store, such as the creation, update, or deletion of a product, Shopify sends a webhook to your Gadget application. This webhook contains information about the event that just occurred.
In Gadget, each Shopify model has corresponding actions (create, update, delete) that are triggered by these webhooks. For instance, if Shopify sends a products/create webhook, Gadget will run the create action on the Product model in your app. This action uses the incoming parameters from the webhook to create a new record in your Gadget database.
To handle these webhooks:
- Gadget verifies the authenticity of the webhook to ensure it's coming from Shopify.
- It then triggers the corresponding action associated with the webhook event.
- The complete payload of the webhook is accessible within the
triggerobject passed to your action code, allowing you to use the data within your action's logic. - If an action fails, Gadget will retry it up to 10 times with increasing delays between attempts. If the action fails on the last attempt, the webhook is considered "lost", though Gadget will later attempt to automatically reconcile the missing webhook with Shopify.
Reconciliation of webhooks
As described in the above process, in the case when a webhook fails or is missed, Gadget automatically catches the missed webhook during a daily reconciliation and re-runs the corresponding action.
Effectively, this means that your data will always go back in sync with Shopify, even after an outage, because of the automated reconciliation that is built into our webhook processing.
Gadget's reconciliation for missed webhooks includes support for webhooks that have filters or includeFields options set, and will run any missed actions with the same params as a webhook-triggered action would receive.
Shopify webhooks within global actions
Shopify webhooks can trigger global actions if a Shopify connection has already been set up on a Gadget app.
To run a global action when a webhook is received, add the Shopify data trigger to your global action, and configure which webhook topics to listen to. Gadget will register the webhook topics and trigger the global action when Shopify sends webhook payloads.
Shopify data triggers on global actions are similar to Shopify data triggers on model actions. However, there is no nightly reconciliation for global action webhook triggers. If a webhook is missed, its payload will not be retrieved later and the action will not run.
Only webhook topics granted by the access scopes selected in a Shopify connection will be available as global action triggers. You can select multiple webhook topics to dispatch to the same global action as well.
If one or more webhooks have been disabled for a particular shop, those webhooks will also no longer trigger any global actions.
Adding a Shopify webhook trigger to a global action
To add a Shopify data trigger to a global action:
- Select your global action in
api/actions - Click + in the TRIGGERS panel and select Shopify
- Select one or more webhook topics
The webhook payload can be found in the trigger object provided by the action context parameter.
In v1.7+ apps, the options block uses a triggerKey instead of a webhooks array. The webhook topics are defined in the corresponding [[webhooks.subscriptions]] entry in your TOML file. The run function remains unchanged. Framework v1.7.0+
shopify.app.tomltoml[[webhooks.subscriptions]] topics = ["products/update"] uri = "https://webhooks.gadget-services.net/shopify/v1/productUpdates?domain=my-app--development.gadget.app"
For more details on how triggerKey works, see the Shopify triggers reference.
Pre-framework v1.7
When to use webhook triggers within global actions
It's best to use webhook triggers on global actions when you want to run code that doesn't affect the state of your application or database. This is because there is no reconciliation for these triggers, so data integrity and consistency can't be guaranteed.
Below are some examples where you might use webhook triggers within global actions.
Use cases
- Real-time notifications and alerts: You can use webhooks to send notifications to your team or customers. For example, you might send a Slack message to your fulfillment team when a new order is created, or notify a customer via SMS or email when their order status changes.
- Forward data to an external service: You can forward a webhook payload to an existing service, for example pushing Shopify order data to an ERP. Depending on the type of data being forwarded, you may want the resiliency built into model action webhooks for this use case.
If the same webhook is being used to trigger both a global action and a model action, the order and timing of action execution are not guaranteed. Either action may be run first, or they may be run concurrently, so actions triggered by the same webhook should not depend on one another.
Disable webhook processing per shop
In v1.7+ apps, the disabledWebhooks field on shopifyShop no longer affects webhook registration. Webhook subscriptions are managed
through the TOML file at the app level. If you need to control webhook processing per shop, implement filtering logic in your action code
instead. See the 1.7 migration guide for details.
Gadget supports limiting which webhooks are processed by certain shops to reduce webhook volume. Certain Shopify shops generate a ton of webhooks. Processing and storing these webhooks can add up to cost too much, especially if you aren't making use you don't want to pay to process and consume webhooks for all models for all shops that have installed your app. For example, within your Shopify app, you may want to disable certain webhooks from processing on Shopify models for free trial users so you do not end up adding up your costs for users on your free trial.
Within Gadget, you can disable certain webhooks from processing so you have greater control over your app.
Every shopifyShop model has a disabledWebhooks field which is a boolean value set to false by default. When the value is changed to true this will disable webhooks within the scheduled sync from syncing data concerning the model associated with the disabledWebhooks value changing.
For example, the update action below sets the disabledWebhooks field to true for the shopifyProduct model on shopifyShop.
This means future reconciliation syncs on webhook re-registrations will disable webhook processing and will not sync data for the shopifyProduct model. In your shopifyShop data, the registeredWebhooks column will no longer include shopifyProduct.
You have to explicitly set a model associated with the disabledWebhooks field value change like the above example, it will not work if
you just flip the boolean value to true.
Note that changes to the disabledWebhooks field will run a shopifyShop update to change the registeredWebhooks field for that shop.
Handling deletion webhooks
Any deletion webhooks will call the delete Action on the model, along with running the delete Action for all Shopify records associated with that model. For example, when a product is deleted, we delete all of its options, images, and variants. All other webhooks will call either the create or update Action, based on whether or not the record currently exists in Gadget.
Registering Shopify webhooks
In some cases, you may need to manually register webhooks to ensure your Shopify app receives the necessary events from a store.
You should only have to manually register webhooks on development environments. Gadget automatically updates webhook registrations during deployment, so you should not need to manually register webhooks for a production environment.
If the selected access scopes have changed and are deployed to production, stores that have installed your app will need to re-authenticate to grant your app access to the new scopes. Webhook registration will happen at that time.
Here are the scenarios when you should manually register Shopify webhooks in development environments:
When editing connections: If you edit a connection to include new models, you may need to register new webhooks for those models. For example, if you add the Collection model, you should register webhooks to receive
collections/create,collections/update, andcollections/delete. If you edit the connection to include additional access scopes, you will have to re-authenticate your app on your development store to grant the app access to the new scopes, and new webhooks will be automatically registered.When missing webhooks: If you notice that certain webhooks are not registered, as indicated on the Installs page of your Shopify connection, you should manually register the missing webhooks. This can happen if you are missing access scopes or topics/namespaces for your registered webhooks.
API version upgrade: Shopify releases a new API version every 3 months, and when you upgrade your Shopify connection's API version, you should ensure that your webhooks are still correctly registered for the new version.
When accessing protected customer data: You will need to request access permissions in the Protected customer data access (PCDA) form on the API access requests page for your Shopify app in the Partners dashboard. After completing the required sections, return to your Gadget app and register the webhooks.
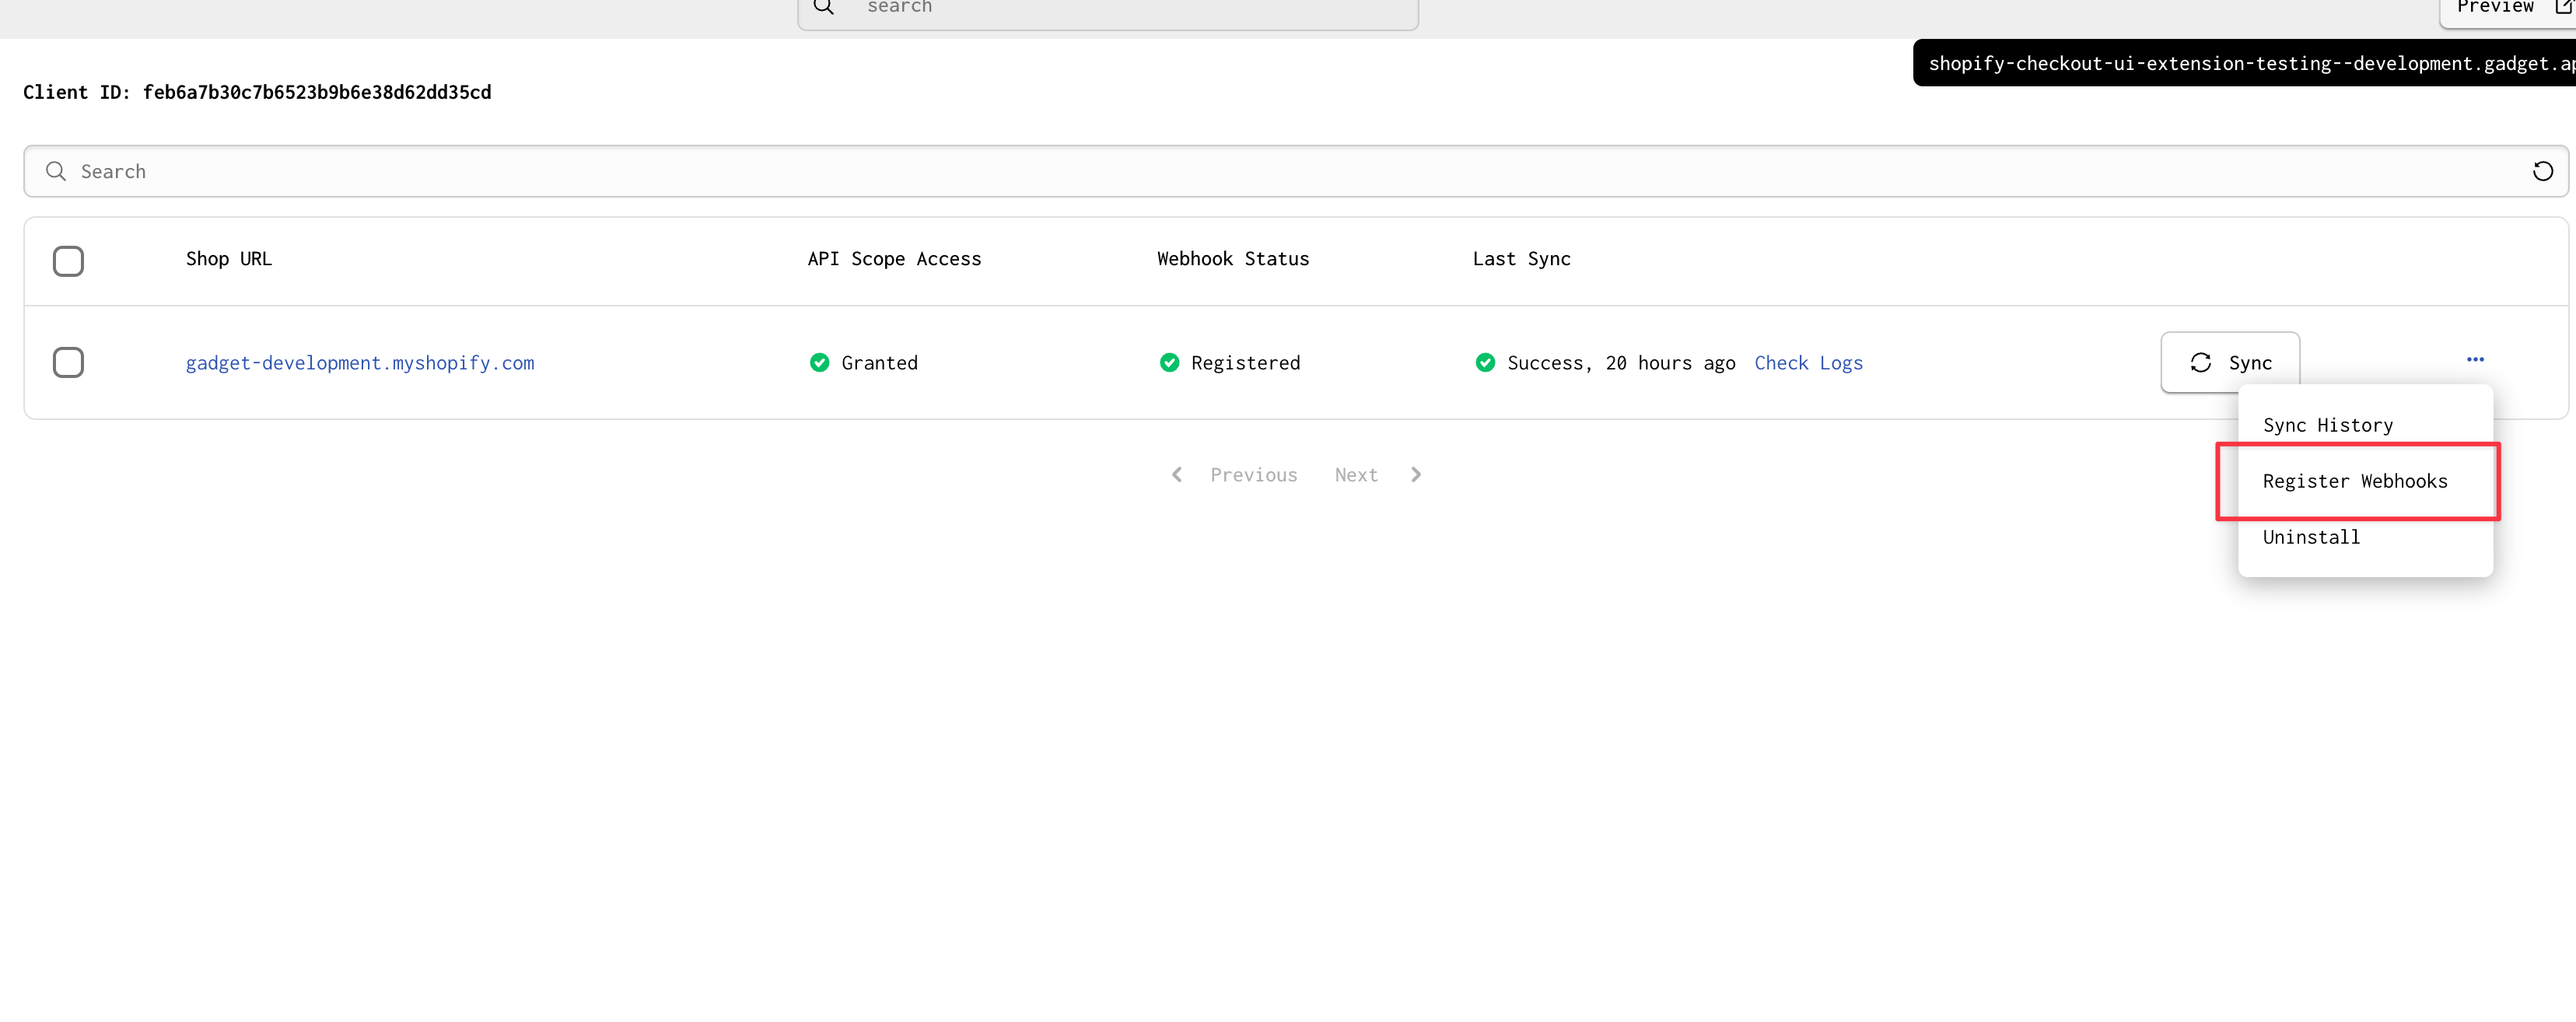
How to register Shopify webhooks
To register Shopify webhooks, you can:
- Navigate to the Installs page for your Connection in Gadget (Settings -> Plugins -> Shopify)
- Click the ⋮ button for any stores you have re-authenticated, and select the Register Webhooks option:
Filtering Shopify webhooks beta
Shopify allows you to filter the events that trigger a webhook for your application. There's two ways to filter webhooks in Shopify:
- limit which records are delivered to your app, which you can do with a webhook filter
- limit which fields of each record are delivered to your app, which you can do with an includeFields list
Both of these strategies can be used individually or together to limit the number of webhook Shopify sends to your app, and lower your total Gadget compute time.
Webhook filters
In Gadget, you can use the same filter syntax provided by Shopify to filter your action's Shopify data triggers.
When a filter is added, Gadget will register the webhook with the filter using Shopify's API, and Shopify will start only sending data to your app that passes the filter. Your filter must be written in Shopify's filter syntax, and can be applied to any Shopify model actions or global actions with the Shopify Data trigger added.
Note that there are some notable differences between Shopify's filtering and search syntax that are important to be aware of when building webhook filters.
Applying a webhook filter
You can apply webhook filters or include fields lists to root model actions triggered by Shopify webhooks, or to webhook-triggered global actions.
To apply a filter to a Shopify data trigger:
- Navigate to an action triggered by a Shopify webhook.
- Open the menu on the filter card and select Filter.
- Enter your filter in the trigger card on the action. In pre-v1.7 apps, this adds the filter to your action
optionsin your source code. Inv1.7+apps, you can configure the filter in the trigger card, and Gadget will automatically sync it to the corresponding[[webhooks.subscriptions]]entry in your TOML file. - Gadget will automatically re-register your webhooks in your development environment, and re-register them in your production environment when you deploy.
In pre-v1.7 apps, filters are stored in action code and should not be defined in the TOML file. In v1.7+ apps, filters are stored in the
TOML file and Gadget keeps your primary TOML file up-to-date automatically when you configure filters through the editor.
Models with Shopify metafield fields enabled are an exception. In 1.7+
apps, these models keep shopifyFilter and includeFields in action code because their webhooks are registered per-shop via the Shopify
GraphQL API rather than through the TOML file.
For example, you could use the following filter on product webhook triggers if you only wanted webhooks to be fired when the product vendor is Nike:
In v1.7+ apps, the filter is stored in your TOML file. You can configure it in the trigger card, and Gadget will automatically sync it to the TOML. Framework v1.7.0+
shopify.app.tomltoml# Trigger key: shopifyProduct-create [[webhooks.subscriptions]] topics = ["products/create", "products/update"] filter = "vendor:Nike" uri = "https://webhooks.gadget-services.net/shopify/v1/shopifyProduct-create?domain=my-app--development.gadget.app"
Pre-framework v1.7
You can also use filters on fields of child models, such as the price of product variants. Webhooks will be fired if ANY of the children pass the filter condition.
For example, you can filter to only receive webhooks for products if any of that product's variants have a price greater than $10.00:
In v1.7+ apps, you define the filter in your TOML file. Framework v1.7.0+
shopify.app.tomltoml# Trigger key: shopifyProduct-update [[webhooks.subscriptions]] topics = ["products/create", "products/update"] filter = "variants.price:>=10.00" uri = "https://webhooks.gadget-services.net/shopify/v1/shopifyProduct-update?domain=my-app--development.gadget.app"
Pre-framework v1.7
Filters on child models must be set on the parent model's action where the webhook is actually received, not the child model's action. Follow the links in the Shopify Data trigger card to find the parent model's action.
Filtering by metafield values
You can filter webhooks based on metafield values by combining conditions on metafields.key, metafields.namespace, and metafields.value. This is useful when you only want to receive webhooks for products (or other resources) that have specific metafield data.
For variant-level metafields on products, prefix the filter with variants.:
Filtering app-owned metafields
When working with app-owned metafields, you can use the $app:namespace shorthand when registering metafield namespaces. However, the $app shorthand does not work in filter expressions. You must use the fully qualified namespace format with your app's API client ID (app--{app-id}--{namespace}).
Replace {app-id} with your Shopify app's API client ID. You can find your app ID in the Shopify Dev Dashboard by navigating to your app. The app ID is the last number in the URL (dev.shopify.com/dashboard/12345/apps/{app-id}).
Checking if a metafield exists
To filter for records where a specific metafield exists (regardless of its value), use the wildcard operator:
Filters are also applied to the nightly reconciliation job that Gadget runs for your Shopify apps. Only missed events that would have triggered a webhook will be re-run.
Filters are not applied to any Shopify data syncs.
Syntax errors in webhook filters will be reported by Shopify and will produce an error in your Gadget logs. Gadget will also alert you to a failed webhook registration. See Shopify's guide on debugging filters for more details.
Modify webhook payloads with includeFields
Gadget also supports Shopify's includeFields option that allows you to modify your webhook payload. This lets you limit the data Shopify adds to a webhook payload so only a subset of the typical payload data is returned.
If a record changes, but no fields in your includeFields list change, Shopify will not send a webhook and you will not incur any Gadget compute time. If fields in your includeFields list do change, the webhook will be sent with only those fields, so you can still subscribe to the data you care about and ignore the data you do not.
To modify webhook payloads in Gadget:
- Navigate to an action triggered by a Shopify webhook.
- Open the menu on the filter card and select Include fields.
- Enter a comma-separated list of fields that will be included in the webhook payload. Ensure you include the
idof any records for model actions, as it is necessary for Gadget to identify the record. - Gadget will automatically re-register your webhooks in your development environment, and re-register them in your production environment when you deploy.
For example, here is how you could limit products/update webhook payloads to only include the product title:
In v1.7+ apps, include_fields is defined in your TOML file. Framework v1.7.0+
shopify.app.tomltoml# Trigger key: shopifyProduct-create [[webhooks.subscriptions]] topics = ["products/create", "products/update"] include_fields = ["id", "title"] uri = "https://webhooks.gadget-services.net/shopify/v1/shopifyProduct-create?domain=my-app--development.gadget.app"
Pre-framework v1.7
You can also include fields across child models, such as the price on all a product's variants:
In v1.7+ apps, nested include_fields values are also defined in your TOML file. Framework v1.7.0+
shopify.app.tomltoml# Trigger key: shopifyProduct-create [[webhooks.subscriptions]] topics = ["products/create", "products/update"] include_fields = ["id", "variants.id", "variants.price"] uri = "https://webhooks.gadget-services.net/shopify/v1/shopifyProduct-create?domain=my-app--development.gadget.app"
Pre-framework v1.7
Field names in the includeFields list must match Shopify's field names, not Gadget's field names, so use snake case! For example:
email_marketing_consent, not emailMarketingConsent.
Handling duplicate webhook payloads from Shopify
Using includeFields with Shopify webhooks helps reduce unnecessary processing in two ways:
- It reduces payload size by only sending specified fields
- Shopify doesn't send duplicate payloads
When includeFields is used, webhook payloads contain less data and often exclude fields that may have changed.
Shopify compares these smaller payloads against recently sent ones. If they are identical, Shopify skips sending the duplicate. Without includeFields, every payload contains all fields and is considered unique, so all are delivered.
Shopify's deduplication system is best-effort and only works within a short time window. Our observations suggest this window is approximately 10 minutes, though this duration appears to vary. This means you may still receive duplicate webhooks if they're sent outside this window.
Gadget's additional deduplication layer
To provide more reliable deduplication, Gadget deduplicates webhooks sent to model actions to further reduce unnecessary processing:
- When Gadget receives a webhook payload, it compares the incoming data against existing model data. If the model has an
updated_atfield, and the field is included in the webhook payload, Gadget will use that value to determine if the record has changed. Otherwise, Gadget will compare each incoming field in the payload to what is stored in the database for each record in the payload. - For any records with detected differences, Gadget will run actions to update the stored record with the new data. For records that haven't changed, Gadget skips running any actions.
- If nothing has changed, Gadget skips running any actions entirely.
This deduplication process happens automatically and adds no additional compute time.
Important: Gadget's deduplication only works with model actions. Global actions triggered by Shopify Data aren't automatically deduplicated, as there's no stored data for comparison. You can implement custom deduplication logic in your global actions if needed.
Excluding the updated_at field
The updated_at timestamp field from Shopify changes every time a new webhook is delivered, as Shopify updates it when any relevant changes are made to any field of the resource.
If you include updated_at in your includeFields, Shopify will still send payloads for every change. The value of updated_at will be different for each incoming payload, which will trigger your actions to run every time. This often defeats the purpose of using includeFields to reduce the number of webhooks you process.
If you want to minimize action processing time, and you don't need the updated_at field's value, Gadget recommends excluding the updated_at field from your includeFields list. With updated_at ignored, Shopify will send fewer payloads, and Gadget's deduplication will be much more effective at preventing unnecessary actions.
Shopify's developer documentation recommends including the updated_at field in your includeFields list as a general good practice.
It is a good practice as the data is useful, but it's not critical. It's not possible to reduce compute time with it included, so Gadget
recommends excluding it from your includeFields list.
Combining webhook filters and payload modification
You can combine webhook filters and includeFields to limit both which records and which fields are delivered to your app.
If you are using webhook filtering at the same time as includeFields for the same webhook, you must ensure that all fields used in the filter are part of the webhook payload. Otherwise Shopify may not be able to register the webhook, or the filter condition could not work as expected.
Here is an example that combines webhook filtering and includeFields:
In v1.7+ apps, you combine filter and include_fields in the same TOML subscription. Framework v1.7.0+
shopify.app.tomltoml# Trigger key: shopifyOrder-create [[webhooks.subscriptions]] topics = ["orders/create", "orders/update"] filter = "financial_status:paid" include_fields = ["id", "financial_status", "fulfillment_status"] uri = "https://webhooks.gadget-services.net/shopify/v1/shopifyOrder-create?domain=my-app--development.gadget.app"
Pre-framework v1.7
Using different filters on different model actions
You can use different webhook filters or includeFields trigger settings for topics on the same Shopify resource. To do this, set the filter for the Gadget model action corresponding to the topic you want to adjust.
For the shopifyProduct model for example, here's how the model actions correspond to the Shopify webhook topics Gadget will register:
| Gadget model action | Shopify topic |
|---|---|
shopifyProduct.create | products/create |
shopifyProduct.update | products/update |
shopifyProduct.delete | products/delete |
To filter on nested models, like shopifyProductVariant, you generally need to set filters or includeFields on both the parent model's create and update actions. This is because the update topic for a resource can create, update, or delete children records, so you need to set the filter or includeFields on both actions to ensure you get all the data you need.
For example, if you want to know everything about a product when it is created, but then only find out about changes to the title in the future as products are updated, you can set no filter on the shopifyProduct.create action, and set includeFields on the shopifyProduct.update action to only include id and title.
Using multiple different filters on the same topics
Gadget supports only one filter and includeFields per Shopify Data trigger, so Shopify model actions can only have one filter or includeFields set. You can combine different filters with Shopify's filtering syntax using the and and or operators.
If you need two independent filters, you can also use Gadget's global actions with the Shopify Data trigger.
To register two different, independent filters, create two different global actions, and add the Shopify Data trigger to each. You can then pick which topics each global action should register webhooks for, and set independent filters or includeFields on each.
Under the hood, Gadget will register one webhook for each global action if their filters are different, and Shopify will send webhooks to the global actions accordingly.
Filling in ignored records or fields later
If you are using a webhook filter to ignore certain records, or includeFields to ignore changes to certain fields, Gadget won't automatically populate that data later. If you do need the data eventually, you can fill in those records or fields later in your app by running a sync. It's up to you to decide how often you want to run a sync to fill in the data.
A common pattern is to schedule a daily sync to run against models you want to fill in all the data for. You can run syncs for all your installed shops on a schedule with a global action like this:
This strategy achieves a good balance of cost versus data freshness.
Webhooks will deliver up-to-date data in real time for the records you care about most, while letting you filter out data you do not need immediately. You can then prevent the rest of the data from drifting too far out of sync by running a scheduled sync at whatever interval meets your requirements.
Setting webhook processing priority
You can control the priority of webhook processing to ensure time-sensitive webhooks are processed before less critical ones. This is particularly useful when your app handles different types of webhooks with varying levels of urgency.
To set a webhook priority, add a priority option to your Shopify trigger configuration:
The priority option accepts one of three values:
"high": Highest priority, processed before all other priorities, can use surge compute if it is enabled in production"default": Standard priority for other background actions"low": Lowest priority, processed after all other priorities
Note that for all background actions, including Shopify webhook actions, priority is not an guarantee of execution order. Gadget will dequeue and run background actions in the roughly the order they are received according to your set priorities, but not exactly the order they are enqueued.
Priority can only be set on root-level model actions that directly receive webhooks, or on global actions. You cannot set priority on
child model actions that inherit webhooks from a parent model (like shopifyProductVariant or shopifyOrderLineItem). If you need to
prioritize webhooks that affect child models, set the priority on the parent model's action instead (like shopifyProduct or
shopifyOrder).
Priorities are supported on the Shopify webhook trigger for both root-level model actions and global actions.
When to use different priorities
Generally speaking, you shouldn't need to adjust the priority of webhook triggers. Gadget will automatically scale your background action workers to handle spikes in load, and keep the time it takes for jobs to be executed low.
However, if you know you're expecting very large influxes of jobs, or you want to be robust to spikes in your foreground request processing using up most of your app's capacity, you can mark individual jobs as high priority to ensure they're dequeued before other jobs. Scenarios like real-time inventory sync to avoid oversell, or realtime payment processing to ensure timely payment are good examples of when you might want to use high priority.
Priority only affects the order in which background actions are dequeued and run. All webhooks are still queued and processed reliably, but higher priority webhooks will be executed before lower priority ones when multiple webhooks are waiting to be processed.
Shopify webhook status
The status and timeline of a Shopify webhook can be observed within the Queues dashboard in Gadget. Here you'll be able to view all Shopify webhooks running and observe the progress in how they're running.