Building with Shopify UI extensions
Expected time: 15 minutes
UI extensions are an important part of the Shopify developer ecosystem. They allow developers to build custom user interfaces that can be embedded directly into the Shopify admin, checkout, or customer accounts experience.
In this tutorial, you will build a customer account UI extension that allows customers to add notes to orders, and extends the first half of Shopify's tutorial:
This tutorial is teaching you how to call your Gadget API from UI extensions. When possible, we recommend you use Shopify metafields to build your extensions.
Prerequisites
Before starting this tutorial, you will need:
- A Shopify Partners account
- A development store
- The Shopify CLI installed locally
- The Gadget CLI installed locally
Step 1: Create a Gadget app and connect to Shopify
To learn how to create a Shopify connection, follow the Shopify quickstart guide. Note that you may also use the assistant to create a new Shopify connection.
- For this tutorial, you will need:
- The
read_ordersscope and theordermodel. - The
read_customersscope withCustomer account authenticationenabled.- This will also automatically select the
customermodel. - This will also create a new access control role called
shopify-storefront-customers.
- This will also automatically select the
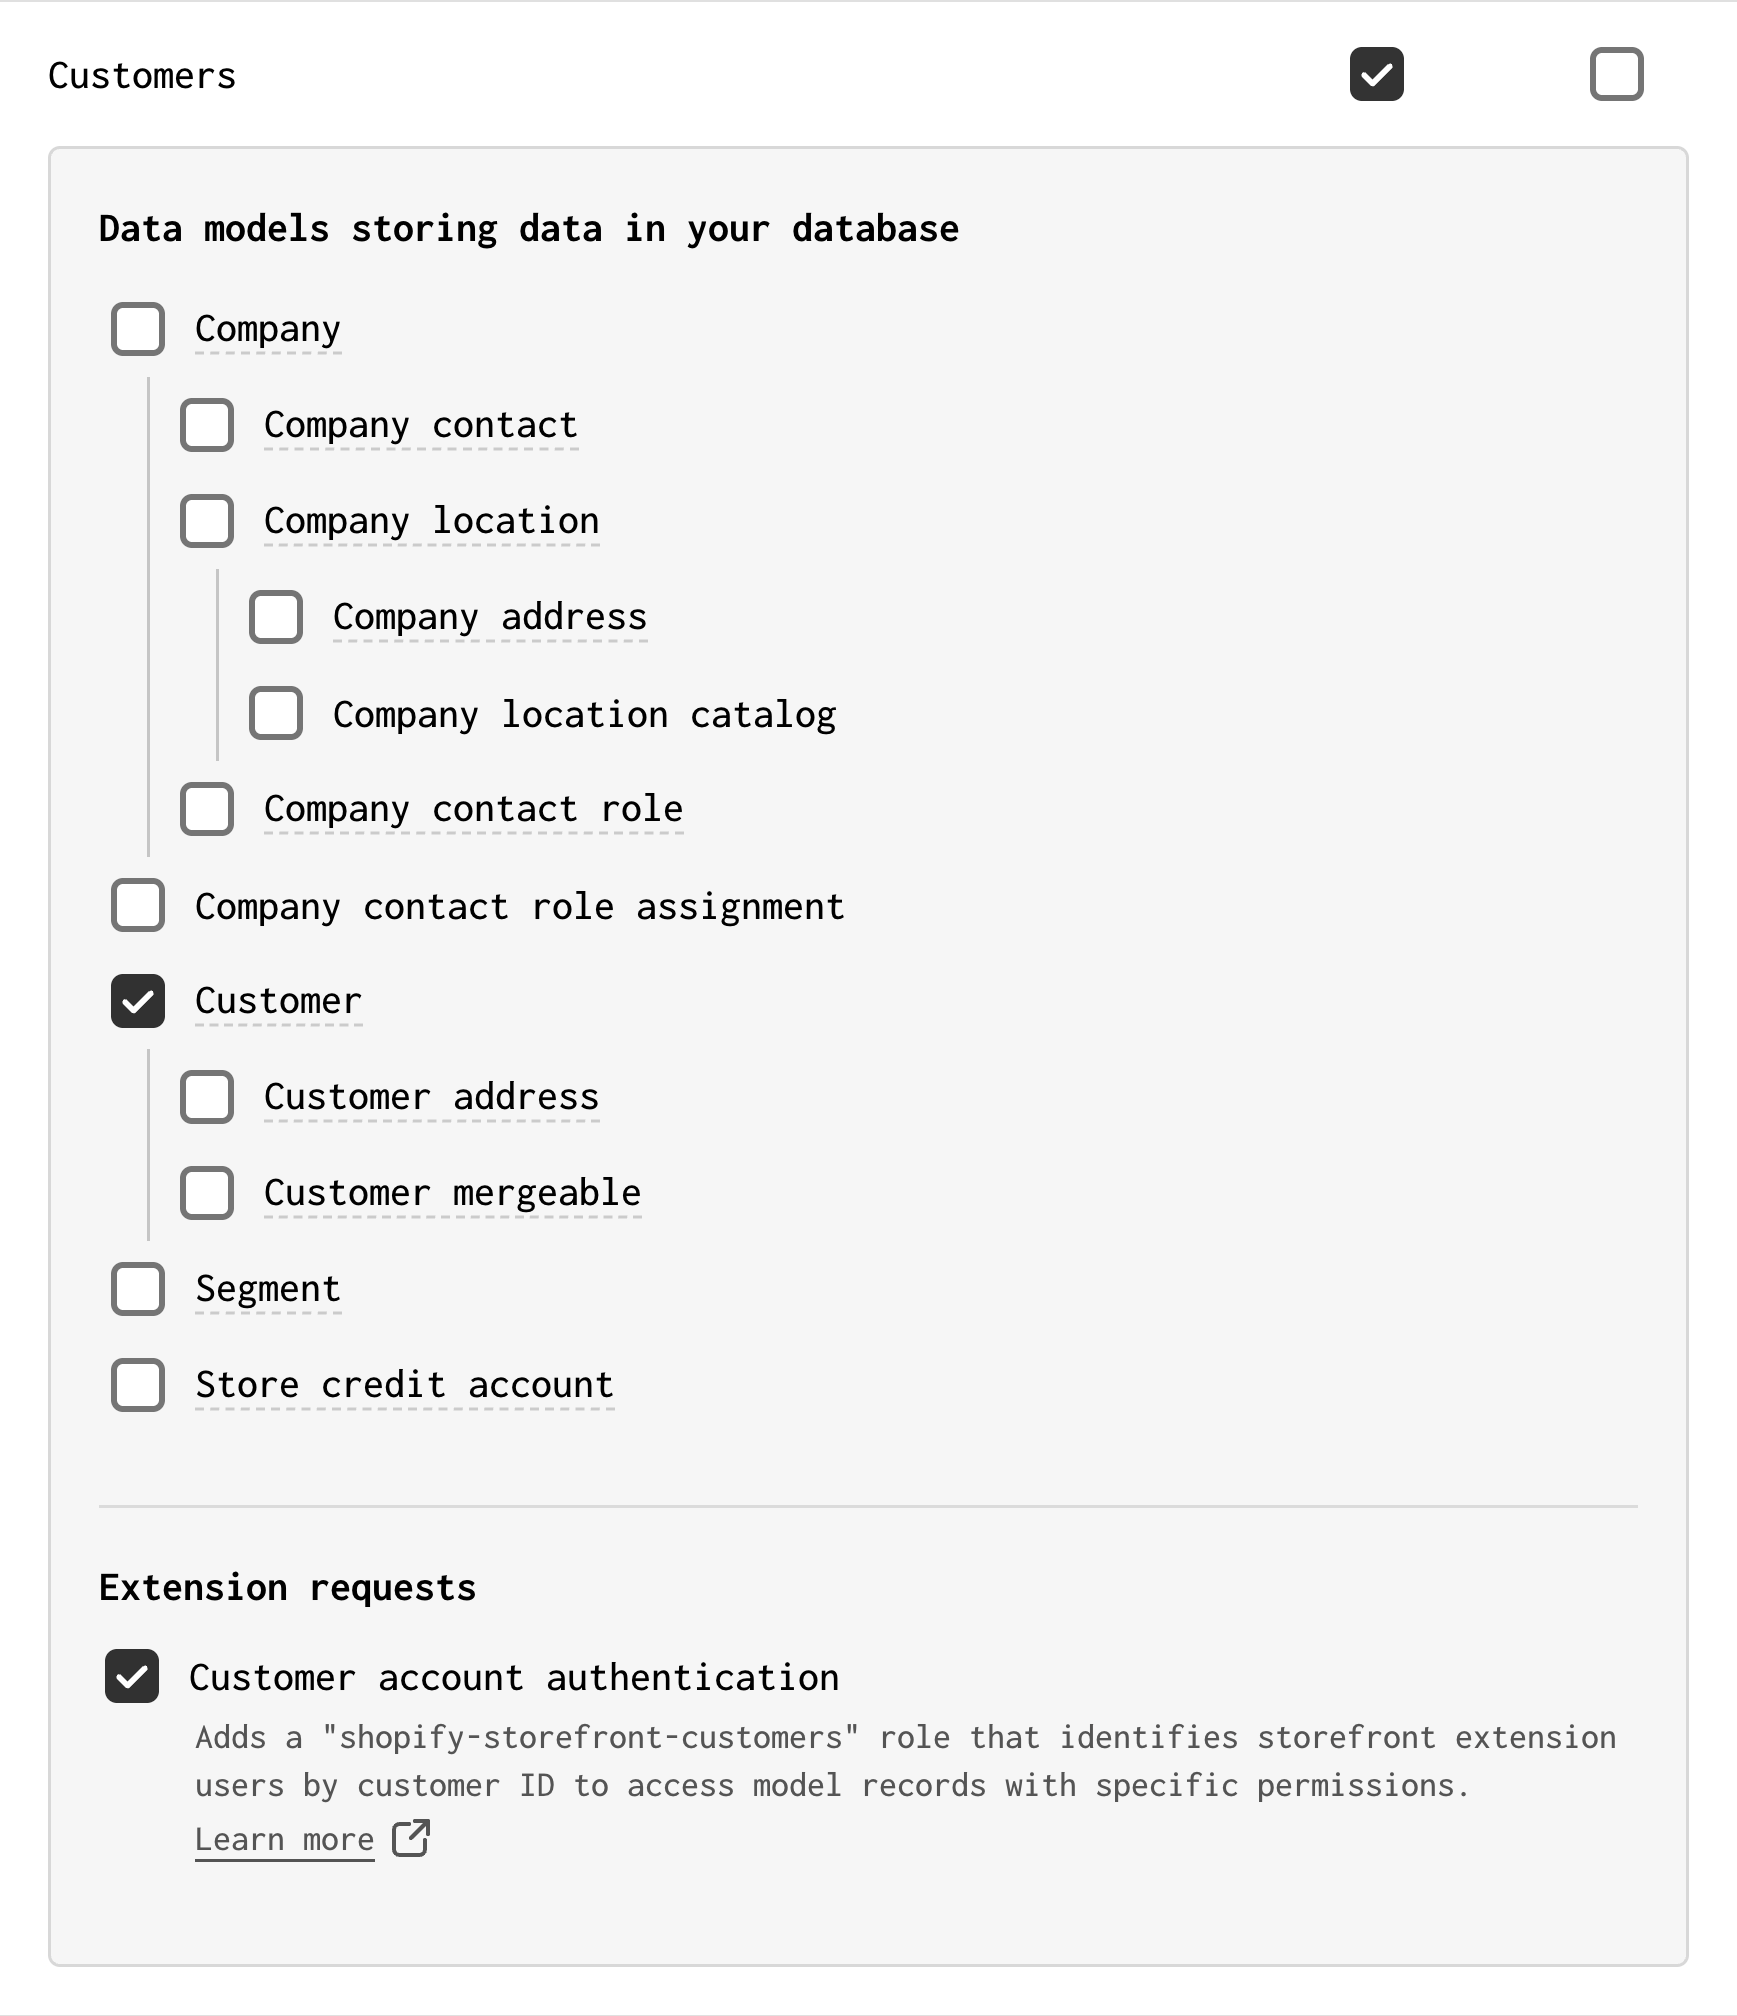
- Fill out all fields on the Protected customer data access form when prompted (both the Protected customer data and Protected customer fields sections).
- On the Installs page, sync recent data after installing and make sure customer and order info exists in your database at
api/models/shopifyCustomer/data.
Step 2: Add a note data model
Now you need a place to store order notes. Data models in Gadget store your app's data and define relationships between different models.
- Add a new
notedata model to your app with the following fields:
| Field name | Field type | Validations |
|---|---|---|
body | string | Required |
order | belongs to shopifyOrder | Required |
customer | belongs to shopifyCustomer | Required |
shop | belongs to shopifyShop | Required |
When setting up the belongs to relationships, make sure to set the inverse of the relationship so that shopifyOrder, shopifyCustomer, and shopifyShop all have many notes.

Step 3: Add preventCrossShopDataAccess to note.create
When you create models in Gadget, a CRUD (create, read, update, delete) API is automatically generated for you.
Your app will need to allow customers to create notes for their orders, so you will use the note.create action.
To ensure that customers can only create notes for their own orders, you need to add a preventCrossShopDataAccess code effect to the note.create action. It automatically takes the context of the current Shopify shop and customer from a token attached to the request that will be made from your app's API client, and prevents customers from creating notes for orders that do not belong to them.
- Update
api/models/note/actions/create.jsto includepreventCrossShopDataAccess:
This tutorial will only use the create action. You could also add preventCrossShopDataAccess to the update, and delete actions, as
well as any custom actions.
Step 4: Update access control
To allow a customer account extension to make call your note API, you need to give the shopify-storefront-customers role permission to call note.create().
- Go to the
accessControl/permissionspage in the Gadget editor. - Grant the
shopify-storefront-customersrole access to the read and create actions on thenotemodel. - Click + Filter next to the
readaction, create a file callednote.gelly, and paste in the following filter to ensure customers can only read their own notes:
gellyfilter ($session: Session) on Note [ where customerId == $session.shopifyCustomerId ]
This filter compares the id of the customer making the request (from the session token) to the customerId field on the note model. Records that do not match this condition will not be returned.
Step 5: Build a customer account UI extension
Now you can build a customer account UI extension to add notes.
Shopify hosts all extensions on their infrastructure, so you only need to write the extension code and deploy it using the Shopify CLI.
To manage Shopify extensions in your Gadget project, you need to use ggt to pull down your project to your local machine.
- In your local terminal, run the
ggt devcommand replacing<YOUR APP SLUG>to pull down your app to your local machine:
terminalggt dev ~/gadget/<YOUR APP SLUG> --app=<YOUR APP SLUG> --env=development
cdinto your project and open it in an editor- Add the following
workspacesdefinition to yourpackage.json:
package.jsonjson{ "workspaces": ["extensions/*"] }
- Add a
.ignorefile to the root of your project - Add the following to
.ignore:
add to .ignore and .gitignoreextensions/*/dist extensions/*/node_modules
- Use the Shopify CLI in your local terminal to generate your customer account UI extension:
terminalshopify app generate extension --template customer_account_ui --name=note-goat
- Select the same Shopify app and development store you used to connect to Shopify when prompted by Shopify's CLI
This command will generate an extensions folder at your project root, and your extension will be generated by Shopify.
Step 5.1: Install required packages
You can install the @gadgetinc/shopify-extensions and @gadgetinc/preact package that contains tooling to make it easier to work with your API client inside extensions.
- Run the following in your terminal at your Gadget project root. You can use the Gadget editor's command palette or your local terminal:
install the required packagesyarn add -W @gadgetinc/shopify-extensions @gadgetinc/preact
Step 5.2: Modify the extension toml configuration file
The first thing you need to do is modify your extension's shopify.extension.toml file. Your app will have two extension targets: one for the menu item button, and one for the modal that appears when the button is clicked.
- Turn on network access in your
extensions/note-goat/shopify.extension.toml:
extensions/note-goat/shopify.extension.tomltoml[extensions.capabilities] network_access = true
- Add an extension target block to your
shopify.extension.tomlfile to specify where your extension will render in the customer account UI:
extensions/note-goat/shopify.extension.tomltoml[[extensions.targeting]] module = "./src/MenuActionItemButtonExtension.jsx" target = "customer-account.order.action.menu-item.render" [[extensions.targeting]] module = "./src/MenuActionModalExtension.jsx" target = "customer-account.order.action.render"
This will grant your extension network access so it can make requests to your Gadget backend.
Step 5.3 Set up your Gadget API client
To call your Gadget API from your extension, you need to set up your Gadget API client.
- Create a file at
extensions/note-goat/src/api.ts. - Paste the following into your extension's
extensions/note-goat/src/api.tsfile. ReplaceYourAppNameClientandyour-app-slugwith your app's slug when importing the API client!:
Step 5.3: Write customer account UI extension code
Now for the extension itself. Shopify UI extensions use Preact and Polaris web components to build UIs.
Details about the code are explained in the comments and below the snippet.
- Create a new file at
extensions/note-goat/src/MenuActionItemButtonExtension.jsx. - Paste the following into your extension's
extensions/note-goat/src/MenuActionItemButtonExtension.jsxfile:
extensions/note-goat/src/MenuActionItemButtonExtension.jsxReactimport "@shopify/ui-extensions/preact"; import { render } from "preact"; import { Provider, useGadget } from "@gadgetinc/shopify-extensions/preact"; import { useMaybeFindFirst } from "@gadgetinc/preact"; import { apiClient } from "./api"; // 1. Export the extension export default async () => { render(<GadgetUIExtension />, document.body); }; // 2. Wrap extension in Gadget Provider to init session management for API client function GadgetUIExtension() { const { sessionToken } = shopify; return ( <Provider api={apiClient} sessionToken={sessionToken}> <MenuActionItemButtonExtension /> </Provider> ); } function MenuActionItemButtonExtension() { // 3. Use ready to ensure session is initialized before making API calls /** @type {{ ready: boolean, api: typeof apiClient }} */ const { api, ready } = useGadget(); // @ts-ignore const [{ data: existingNote, fetching, error }] = useMaybeFindFirst(api.note, { filter: { orderId: { equals: shopify.orderId.split("/").pop(), }, }, pause: !ready, // use a live query to hide the Add note button after a note is created live: true, }); // only show button if no existing note return !fetching && !existingNote && <s-button>Add note</s-button>; }
The @gadgetinc/shopify-extensions package contains the Provider component that initializes the Gadget API client with the current Shopify session token. You then use Preact hooks from @gadgetinc/preact to call your API in a "Preact-ful" way.
This code checks if a note already exists for the current order with the useMaybeFindFirst Preact hook. If a note exists, the "Add note" button will not be shown.
- Create a new file at
extensions/note-goat/src/MenuActionModalExtension.jsx. - Paste the following into your extension's
extensions/note-goat/src/MenuActionModalExtension.jsxfile:
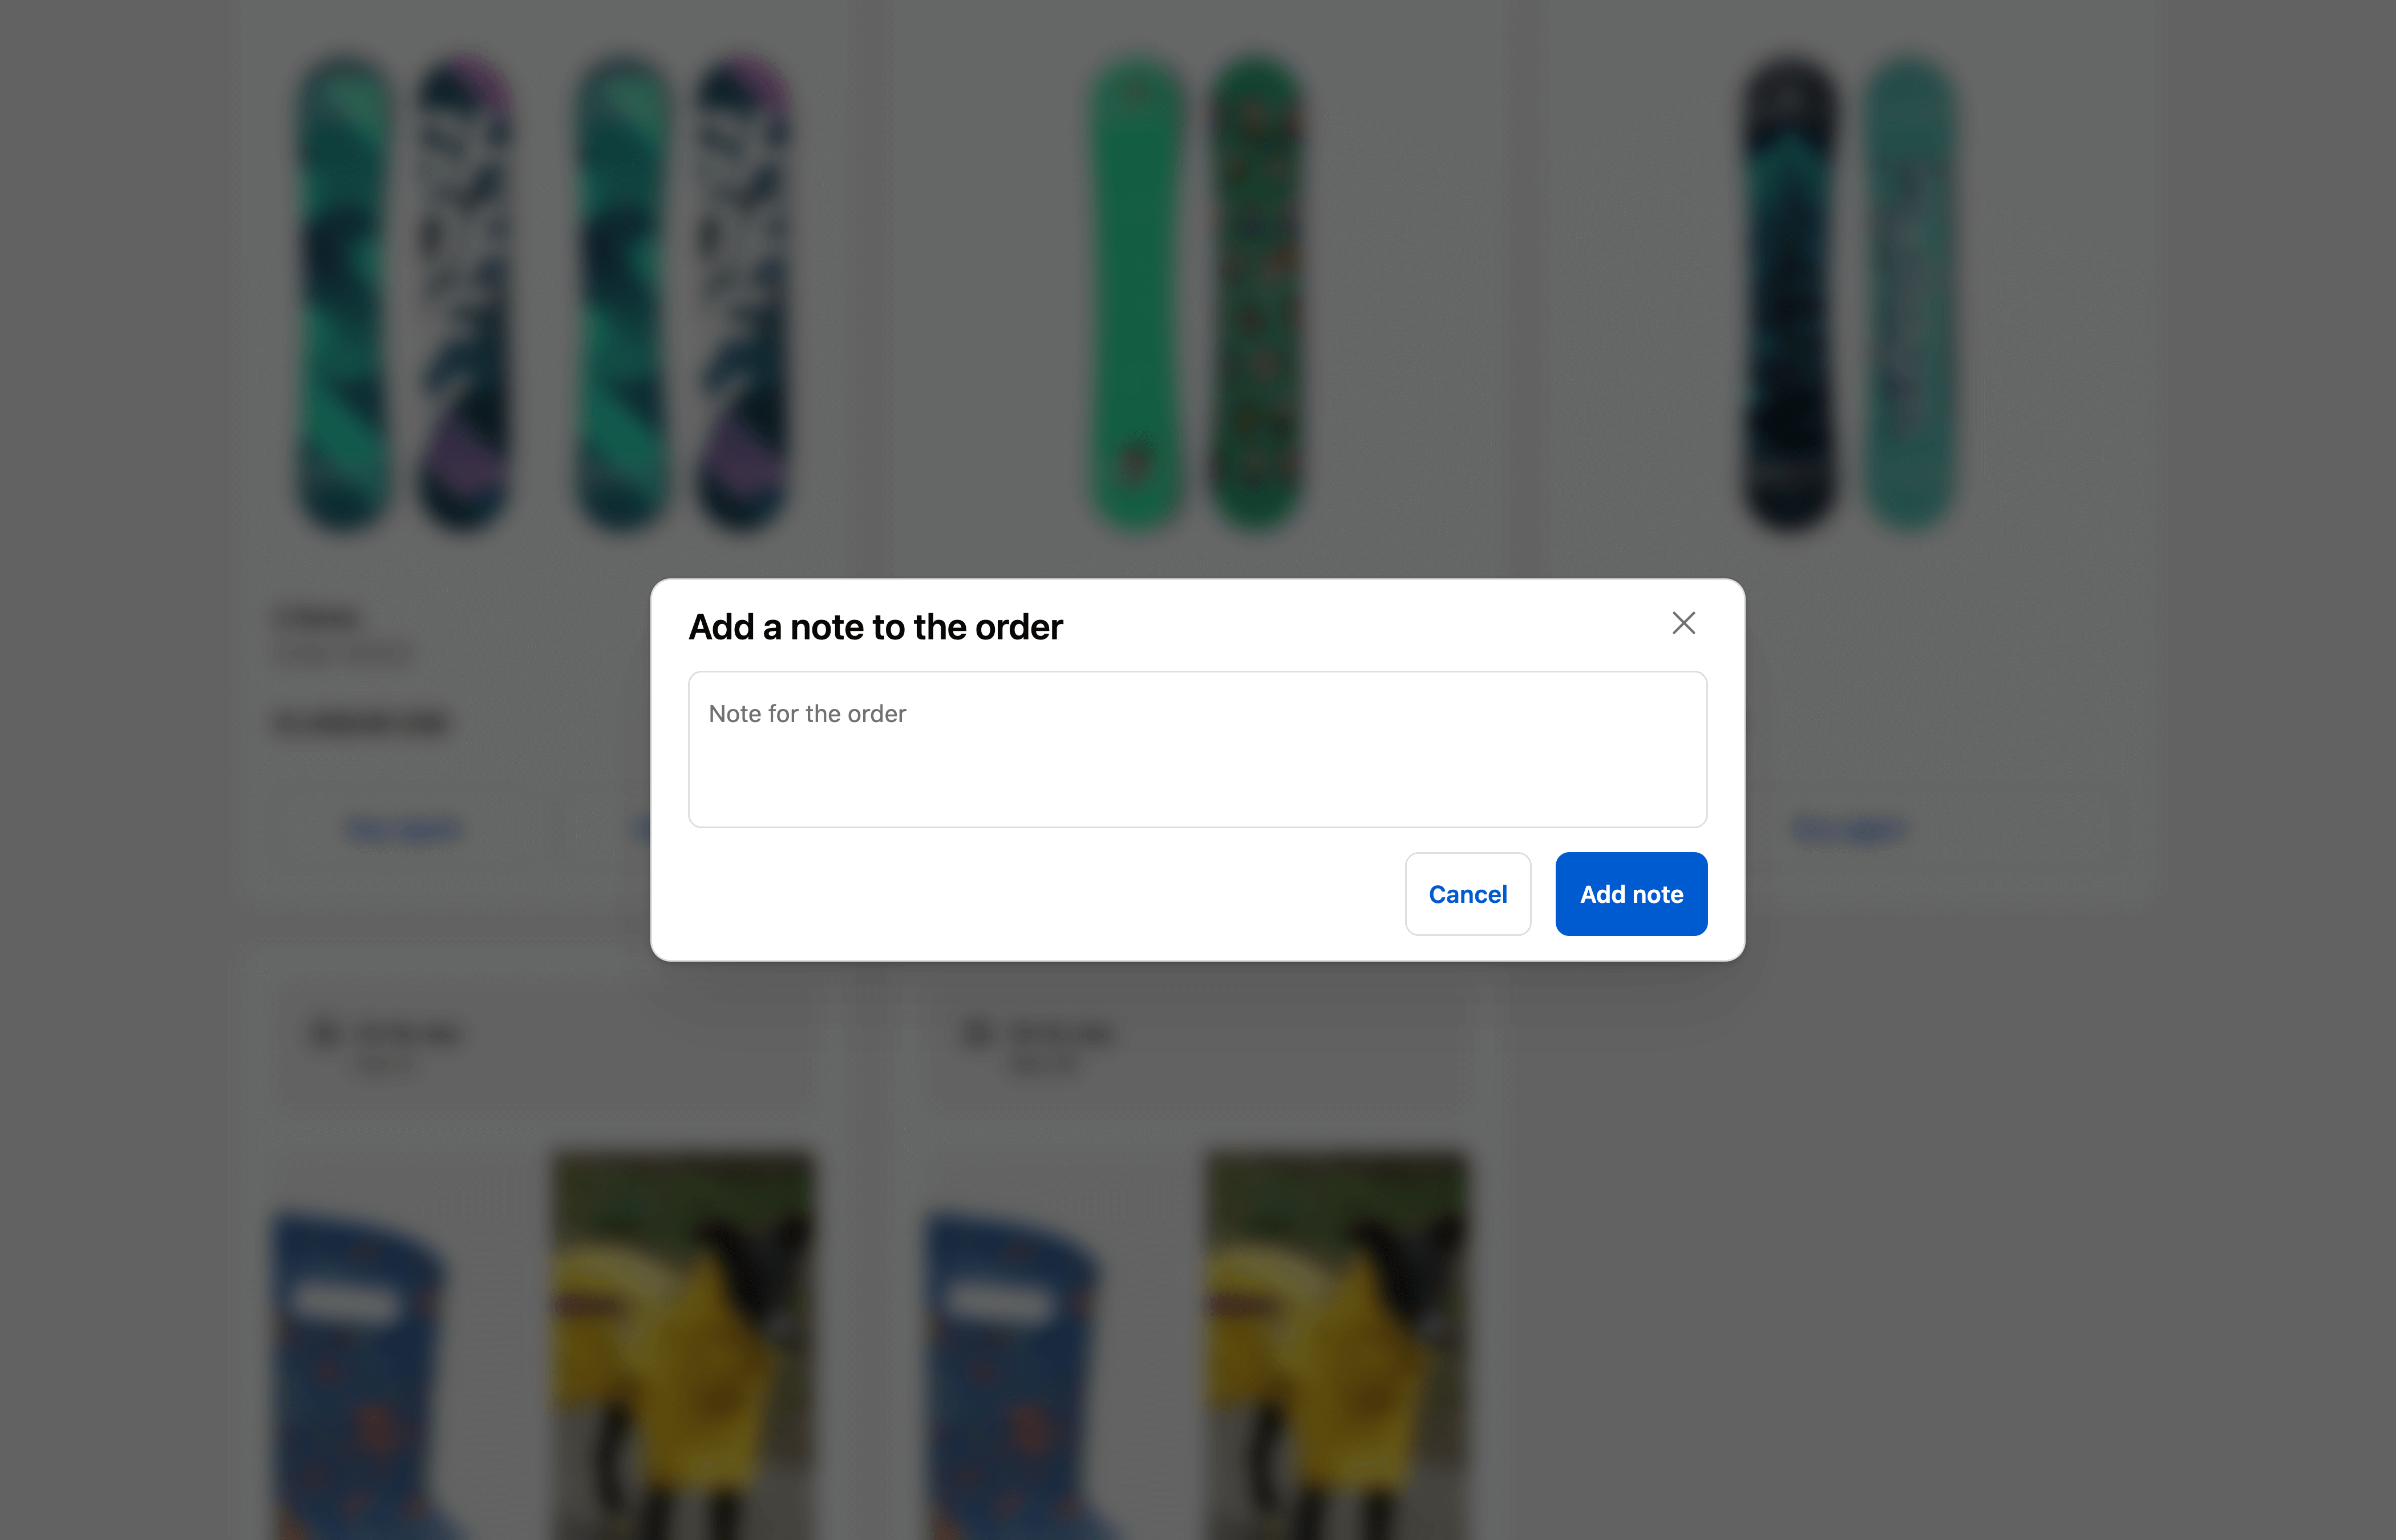
extensions/note-goat/src/MenuActionModalExtension.jsxReactimport "@shopify/ui-extensions/preact"; import { render } from "preact"; import { useState } from "preact/hooks"; import { Provider, useGadget } from "@gadgetinc/shopify-extensions/preact"; import { useAction } from "@gadgetinc/preact"; import { apiClient } from "./api"; // 1. Export the extension export default async () => { render(<GadgetUIExtension />, document.body); }; // 2. Wrap extension in Gadget Provider function GadgetUIExtension() { const { sessionToken } = shopify; return ( <Provider api={apiClient} sessionToken={sessionToken}> <MenuActionModalExtension /> </Provider> ); } function MenuActionModalExtension() { /** @type {{ api: typeof apiClient }} */ const { api } = useGadget(); const [note, setNote] = useState(""); const [{ fetching: savingNote }, saveNote] = useAction(api.note.create, { select: { id: true, }, }); async function save() { try { // make a request to the server to add a note await saveNote({ body: note, order: { _link: shopify.orderId.split("/").pop(), }, }); } catch (error) { console.log(error); } finally { shopify.close(); } } return ( <s-customer-account-action heading="Add a note to the order"> {savingNote ? ( <s-text>Saving note...</s-text> ) : ( <s-text-area value={note} onChange={(e) => setNote(e.target.value)} rows={3} label="Note for the order" /> )} <s-button slot="primary-action" type="submit" disabled={savingNote} onClick={save}> Add note </s-button> <s-button slot="secondary-actions" onClick={() => shopify.close()} variant="secondary"> Cancel </s-button> </s-customer-account-action> ); }
This extension uses the useAction Preact hook to call the note.create action when the user submits a note. The order relationship is linked using the order ID from the shopify global object.
Notice that extension setup is similar between the two extension files. The main difference is in the UI components and the API calls.
Test your extension
Now that you've built your extension, you need to test it out.
- If you don't have any recent orders in your development store, create one in the store admin. Make sure the order is associated with the customer account you are using for testing!
- Start the extension dev server by running
shopify app devfrom your app root OR runyarn shopify:devfrom the terminal in the Gadget editor.
run in the Gadget editor's terminalyarn shopify:dev
run in your local terminal at your Gadget project rootyarn shopify app dev
- When prompted, make sure you select the same development store you used to connect your Gadget app to Shopify.
- Open the Preview URL to access the Shopify Developer Console and open the provided customer account UI extension URL.
You might be prompted to log in via email. Once you do, navigate back to the extension page URL. There should be an "Add note" button in the order actions menu.
Try adding note. View created notes at api/models/note/data in the Gadget editor.
Congrats! You've built a Shopify UI extension that interacts with your Gadget backend.
Next steps
Have questions about the tutorial? Join Gadget's developer Discord to ask Gadget employees and join the Gadget developer community!
Extend this tutorial
If you want to extend this tutorial, you could:
- Allow buyers to view and edit existing notes.
- Build an admin UI in your Gadget app so merchants can view and manage notes.
- Notify merchants when new notes are created.